> ## Documentation Index
> Fetch the complete documentation index at: https://docs.fydemy.com/llms.txt
> Use this file to discover all available pages before exploring further.
# The Kitchen — Laravel
After learning frontend basics with HTML, CSS, and JavaScript, have you ever wondered how sites like Tokopedia, Instagram, TikTok, and others actually work? There are quite a few, right? We could do it all with just frontend — but the data would be static, no posts from other people updating, no new stories.
This is where things get a bit dry because we're dealing with databases, data, logic, and APIs. This is also where your programming understanding gets truly tested!
Think of the **backend** like a kitchen: it prepares the "food" that's then delivered by the waiter (API) to the customer (frontend).
That's the big picture. To make it more concrete, let's jump straight into practice.
## Backend
This is where the programming logic lives. We'll be using **Laravel** — a powerful and elegant PHP framework. The backend covers databases, API routing, business logic, and much more.
### Database
Where do you think sites like Instagram store user data and posts? In Excel, Word, Notepad? Technically possible, but it won't scale. We use a **database** — similar to a table — and there are two main types: **relational** and **non-relational**.
* **Relational** — You define column names and their data types (the structure). Examples: MySQL, PostgreSQL, etc.
* **Non-relational** — No fixed schema; you insert data without defining the structure upfront, often in the form of objects/documents. Examples: MongoDB, Redis.
### Database Setup
* Download [Laragon](https://laragon.org/docs/install). Run the installer and accept the default settings.
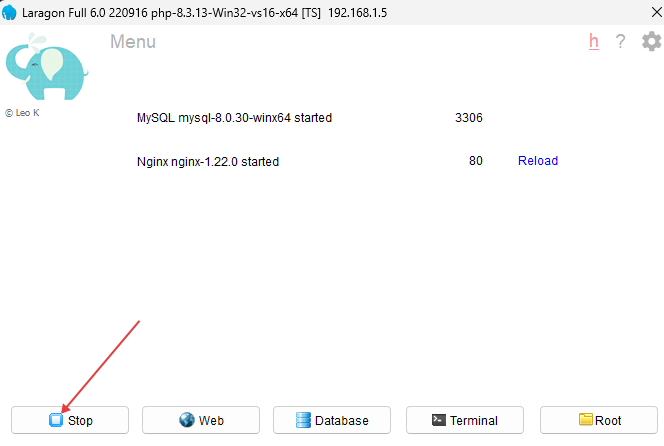
* Once installed, open the app and click **Start All**.
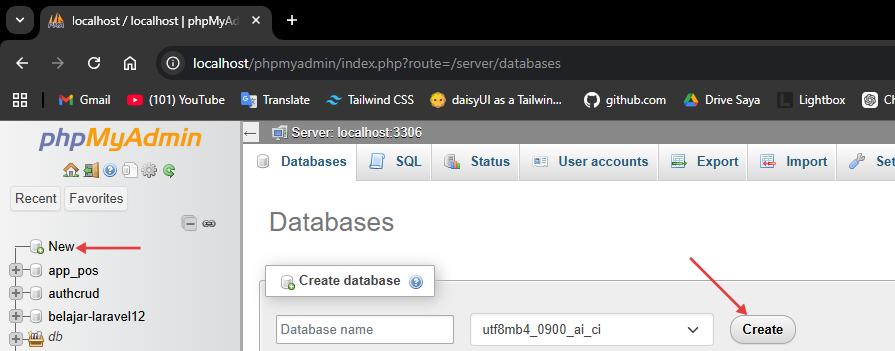
 * Open `localhost/phpmyadmin` in your browser. Create a new database by clicking **New** in the sidebar, enter a name, then click **Create**.
 ### API Routing
Complex applications usually have many features — like Instagram: upload, edit, delete, view posts, view profiles, algorithm, etc. We break these down into **routes**. For example:
## Let's Build the API
APIs often expose **CRUD** (Create, Read, Update, Delete) via different routes. For example:
### API Routing
Complex applications usually have many features — like Instagram: upload, edit, delete, view posts, view profiles, algorithm, etc. We break these down into **routes**. For example:
## Let's Build the API
APIs often expose **CRUD** (Create, Read, Update, Delete) via different routes. For example:
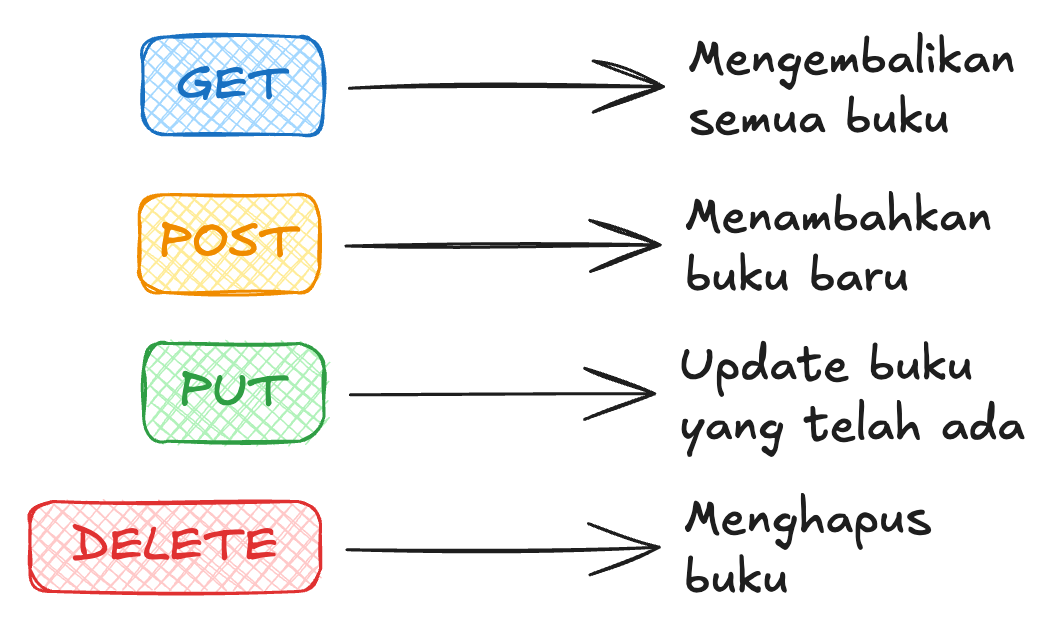 * **GET** `/posts` — list/view posts
* **PUT** `/posts/{postId}` — update a post by ID
### How Do You Run It?
First, install [Composer](https://getcomposer.org/download). We'll use **Laravel** to manage both the API and the database.
***
# Laravel
Laravel is a PHP framework that already covers almost everything we need: routing, ORM, validation, and much more.
Make sure **PHP** and **Composer** (PHP's package manager, like NPM but for PHP) are already installed. Check with:
```bash theme={null}
php -v
composer -v
```
Create a new Laravel project and navigate into the folder:
```bash theme={null}
composer create-project laravel/laravel library
cd library
```
This is like `npm init -y` but far more complete — Laravel immediately sets up the entire project structure.
## Fundamentals
### Important Folder Structure
```
library/
├── app/
│ ├── Http/
│ │ ├── Controllers/ ← request logic
│ │ └── Requests/ ← request validation
│ └── Models/ ← database table representation
├── routes/
│ ├── api.php ← API route definitions
│ └── web.php ← routes for web pages
├── database/
│ └── migrations/ ← table structure (like Prisma schema)
├── .env ← configuration & secret variables
└── artisan ← Laravel's built-in CLI tool
```
### Installing Packages
To install a package in Laravel, use Composer:
```bash theme={null}
composer require [package-name]
```
Example:
```bash theme={null}
composer require laravel/sanctum
```
For packages only needed during **development**, use the `--dev` flag:
```bash theme={null}
composer require --dev barryvdh/laravel-debugbar
```
In `composer.json`, installed packages appear under `require` or `require-dev`:
```json theme={null}
{
"name": "laravel/laravel",
"require": {
"php": "^8.2",
"laravel/framework": "^11.0"
},
"require-dev": {
"barryvdh/laravel-debugbar": "^3.13"
}
}
```
### .env
The `.env` file is one of the most important files for storing **secret variables**. Its values live on the server, not in the code — so they stay safe. Examples: database connection, port, API keys.
Laravel automatically reads `.env` without needing to install any additional library.
**.env**
```
APP_NAME=Library
APP_PORT=8000
DB_CONNECTION=mysql
DB_HOST=127.0.0.1
DB_PORT=3306
DB_DATABASE=library
DB_USERNAME=root
DB_PASSWORD=
```
From anywhere in Laravel, access `.env` variables using the `env()` helper:
```php theme={null}
$dbName = env('DB_DATABASE'); // 'library'
```
Or use `config()` to access pre-mapped configuration:
```php theme={null}
$dbName = config('database.connections.mysql.database');
```
### Running the App
**Standard way**
```bash theme={null}
php artisan serve
```
**With a custom port**
```bash theme={null}
php artisan serve --port=8080
```
Unlike Node.js which requires a manual restart on every change, you can use **[Vite HMR](https://laravel.com/docs/vite)** for the frontend, or simply save & refresh for the backend — since PHP is a scripting language, every request always reads the latest file.
### Artisan CLI
`artisan` is Laravel's built-in CLI tool, like the Swiss Army Knife of Laravel. Some frequently used commands:
```bash theme={null}
php artisan serve # Start the development server
php artisan make:model # Create a new Model
php artisan make:controller # Create a new Controller
php artisan migrate # Run migrations to the database
php artisan route:list # View all registered routes
php artisan tinker # Interactive REPL for testing
```
***
# Library
There's a library that needs modernizing. You have an idea: build a web app so book loans are tracked automatically and digitally. You could use Google Sheets — but we can build something simpler and more minimal, with only the features needed, without all the menus and complexity of a spreadsheet. Curious how? Let's get started!
## Initial Overview
This continues from the **syntax** module. Make sure you've already installed Laravel and set up Composer. Here's the structure of our API workflow:
* **GET** `/posts` — list/view posts
* **PUT** `/posts/{postId}` — update a post by ID
### How Do You Run It?
First, install [Composer](https://getcomposer.org/download). We'll use **Laravel** to manage both the API and the database.
***
# Laravel
Laravel is a PHP framework that already covers almost everything we need: routing, ORM, validation, and much more.
Make sure **PHP** and **Composer** (PHP's package manager, like NPM but for PHP) are already installed. Check with:
```bash theme={null}
php -v
composer -v
```
Create a new Laravel project and navigate into the folder:
```bash theme={null}
composer create-project laravel/laravel library
cd library
```
This is like `npm init -y` but far more complete — Laravel immediately sets up the entire project structure.
## Fundamentals
### Important Folder Structure
```
library/
├── app/
│ ├── Http/
│ │ ├── Controllers/ ← request logic
│ │ └── Requests/ ← request validation
│ └── Models/ ← database table representation
├── routes/
│ ├── api.php ← API route definitions
│ └── web.php ← routes for web pages
├── database/
│ └── migrations/ ← table structure (like Prisma schema)
├── .env ← configuration & secret variables
└── artisan ← Laravel's built-in CLI tool
```
### Installing Packages
To install a package in Laravel, use Composer:
```bash theme={null}
composer require [package-name]
```
Example:
```bash theme={null}
composer require laravel/sanctum
```
For packages only needed during **development**, use the `--dev` flag:
```bash theme={null}
composer require --dev barryvdh/laravel-debugbar
```
In `composer.json`, installed packages appear under `require` or `require-dev`:
```json theme={null}
{
"name": "laravel/laravel",
"require": {
"php": "^8.2",
"laravel/framework": "^11.0"
},
"require-dev": {
"barryvdh/laravel-debugbar": "^3.13"
}
}
```
### .env
The `.env` file is one of the most important files for storing **secret variables**. Its values live on the server, not in the code — so they stay safe. Examples: database connection, port, API keys.
Laravel automatically reads `.env` without needing to install any additional library.
**.env**
```
APP_NAME=Library
APP_PORT=8000
DB_CONNECTION=mysql
DB_HOST=127.0.0.1
DB_PORT=3306
DB_DATABASE=library
DB_USERNAME=root
DB_PASSWORD=
```
From anywhere in Laravel, access `.env` variables using the `env()` helper:
```php theme={null}
$dbName = env('DB_DATABASE'); // 'library'
```
Or use `config()` to access pre-mapped configuration:
```php theme={null}
$dbName = config('database.connections.mysql.database');
```
### Running the App
**Standard way**
```bash theme={null}
php artisan serve
```
**With a custom port**
```bash theme={null}
php artisan serve --port=8080
```
Unlike Node.js which requires a manual restart on every change, you can use **[Vite HMR](https://laravel.com/docs/vite)** for the frontend, or simply save & refresh for the backend — since PHP is a scripting language, every request always reads the latest file.
### Artisan CLI
`artisan` is Laravel's built-in CLI tool, like the Swiss Army Knife of Laravel. Some frequently used commands:
```bash theme={null}
php artisan serve # Start the development server
php artisan make:model # Create a new Model
php artisan make:controller # Create a new Controller
php artisan migrate # Run migrations to the database
php artisan route:list # View all registered routes
php artisan tinker # Interactive REPL for testing
```
***
# Library
There's a library that needs modernizing. You have an idea: build a web app so book loans are tracked automatically and digitally. You could use Google Sheets — but we can build something simpler and more minimal, with only the features needed, without all the menus and complexity of a spreadsheet. Curious how? Let's get started!
## Initial Overview
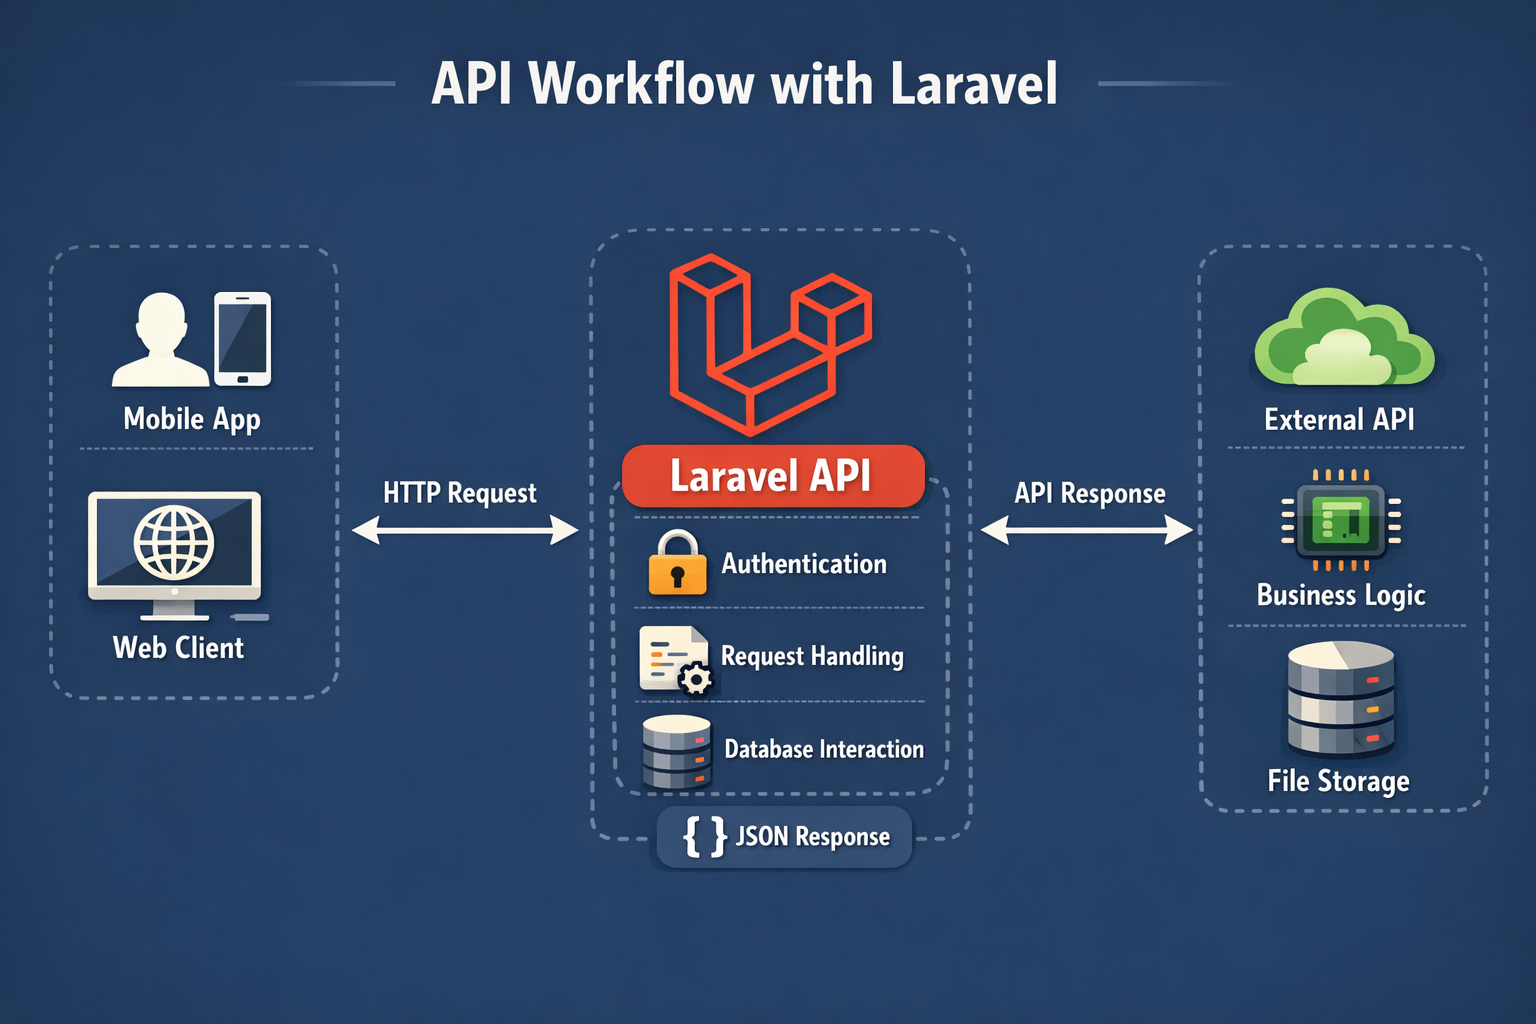
This continues from the **syntax** module. Make sure you've already installed Laravel and set up Composer. Here's the structure of our API workflow:
 ## Ready?
### Initial Laravel Setup
Create a new project and configure `.env`:
```
library
├── app/
├── database/
├── routes/
├── .env
└── artisan
```
**.env**
```
APP_PORT=8000
DB_CONNECTION=mysql
DB_HOST=127.0.0.1
DB_PORT=3306
DB_DATABASE=library
DB_USERNAME=root
DB_PASSWORD=
```
Start the server:
```bash theme={null}
php artisan serve
```
Open your browser to `localhost:8000`. Laravel already displays a welcome page by default because there's a route in `routes/web.php`.
### Migration & Model Setup
In Node.js we use Prisma to define the schema and interact with the database. In Laravel, we use **Migrations** for table structure and **Eloquent ORM** for database operations — both are built-in.
Create a Model and Migration at the same time with a single command:
```bash theme={null}
php artisan make:model Book --migration
```
This creates two files: `app/Models/Book.php` and a migration file in `database/migrations/`.
Open the migration file (its name has a timestamp, like `2024_01_01_000000_create_books_table.php`) and edit it:
**database/migrations/xxxx\_create\_books\_table.php**
```php theme={null}
public function up(): void
{
Schema::create('books', function (Blueprint $table) {
$table->uuid('id');
$table->string('name')->unique();
$table->string('borrower');
$table->timestamps();
});
}
```
* `uuid('id')` — a unique id in the form of a random string (equivalent to `@default(uuid())` in Prisma)
* `string('name')->unique()` — a name field that cannot be duplicated
* `timestamps()` — automatically adds `created_at` and `updated_at` columns
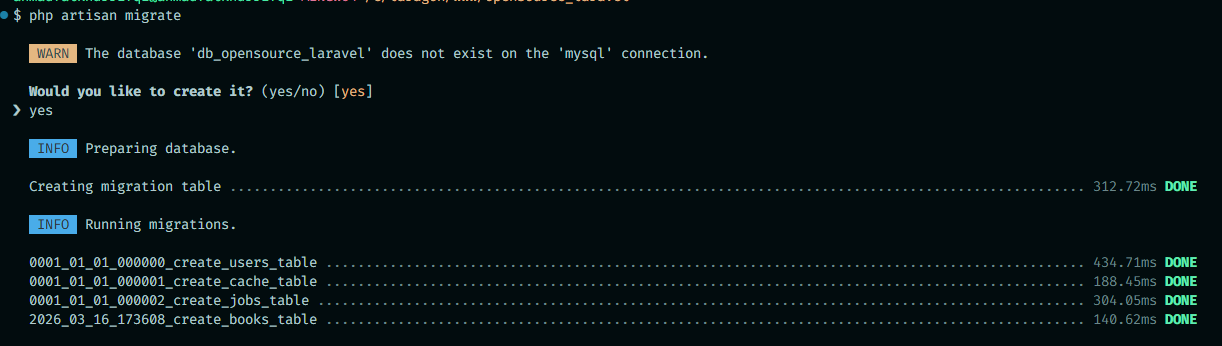
Apply the migration to the database:
```bash theme={null}
php artisan migrate
```
Open your terminal — the `books` table is already there!
## Ready?
### Initial Laravel Setup
Create a new project and configure `.env`:
```
library
├── app/
├── database/
├── routes/
├── .env
└── artisan
```
**.env**
```
APP_PORT=8000
DB_CONNECTION=mysql
DB_HOST=127.0.0.1
DB_PORT=3306
DB_DATABASE=library
DB_USERNAME=root
DB_PASSWORD=
```
Start the server:
```bash theme={null}
php artisan serve
```
Open your browser to `localhost:8000`. Laravel already displays a welcome page by default because there's a route in `routes/web.php`.
### Migration & Model Setup
In Node.js we use Prisma to define the schema and interact with the database. In Laravel, we use **Migrations** for table structure and **Eloquent ORM** for database operations — both are built-in.
Create a Model and Migration at the same time with a single command:
```bash theme={null}
php artisan make:model Book --migration
```
This creates two files: `app/Models/Book.php` and a migration file in `database/migrations/`.
Open the migration file (its name has a timestamp, like `2024_01_01_000000_create_books_table.php`) and edit it:
**database/migrations/xxxx\_create\_books\_table.php**
```php theme={null}
public function up(): void
{
Schema::create('books', function (Blueprint $table) {
$table->uuid('id');
$table->string('name')->unique();
$table->string('borrower');
$table->timestamps();
});
}
```
* `uuid('id')` — a unique id in the form of a random string (equivalent to `@default(uuid())` in Prisma)
* `string('name')->unique()` — a name field that cannot be duplicated
* `timestamps()` — automatically adds `created_at` and `updated_at` columns
Apply the migration to the database:
```bash theme={null}
php artisan migrate
```
Open your terminal — the `books` table is already there!
 ### Model Setup
Open `app/Models/Book.php` and add the configuration:
```php theme={null}
### GET `/api/books`
Open `app/Http/Controllers/BookController.php` and fill in the `index()` method:
```php theme={null}
use App\Models\Book;
public function index()
{
$data = Book::all();
return response()->json($data, 200);
}
```
`Book::all()` retrieves all data from the table.
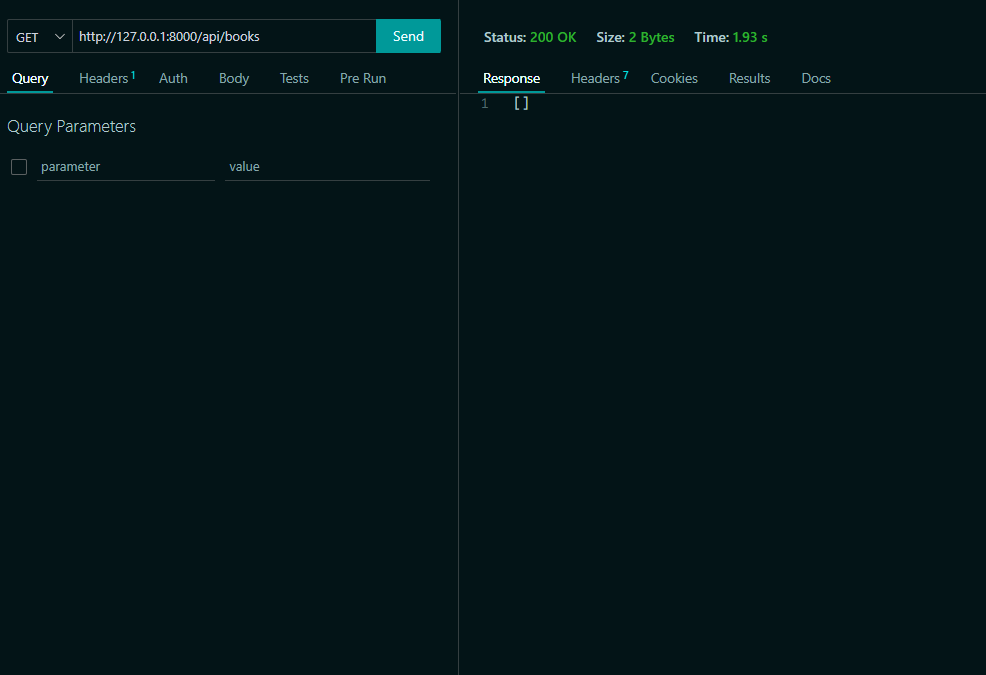
Open **Thunder Client**, send a GET request to `http://localhost:8000/api/books`, and click **Send**. The response will be `[]` since no books have been added yet.
### Model Setup
Open `app/Models/Book.php` and add the configuration:
```php theme={null}
### GET `/api/books`
Open `app/Http/Controllers/BookController.php` and fill in the `index()` method:
```php theme={null}
use App\Models\Book;
public function index()
{
$data = Book::all();
return response()->json($data, 200);
}
```
`Book::all()` retrieves all data from the table.
Open **Thunder Client**, send a GET request to `http://localhost:8000/api/books`, and click **Send**. The response will be `[]` since no books have been added yet.
 ### POST `/api/books`
Here we read data from the request body.
```php theme={null}
use Illuminate\Http\Request;
use Illuminate\Support\Str;
public function store(Request $request)
{
$request->validate([
'name' => 'required|string|unique:books',
'borrower' => 'required|string',
]);
Book::create([
'id' => Str::uuid()->toString(),
'name' => $request->name,
'borrower' => $request->borrower,
]);
return response()->json(['message' => 'Book added successfully!'], 201);
}
```
Laravel **automatically** parses the JSON request body. `$request->validate()` also immediately returns a 422 error if validation fails — no manual try/catch needed!
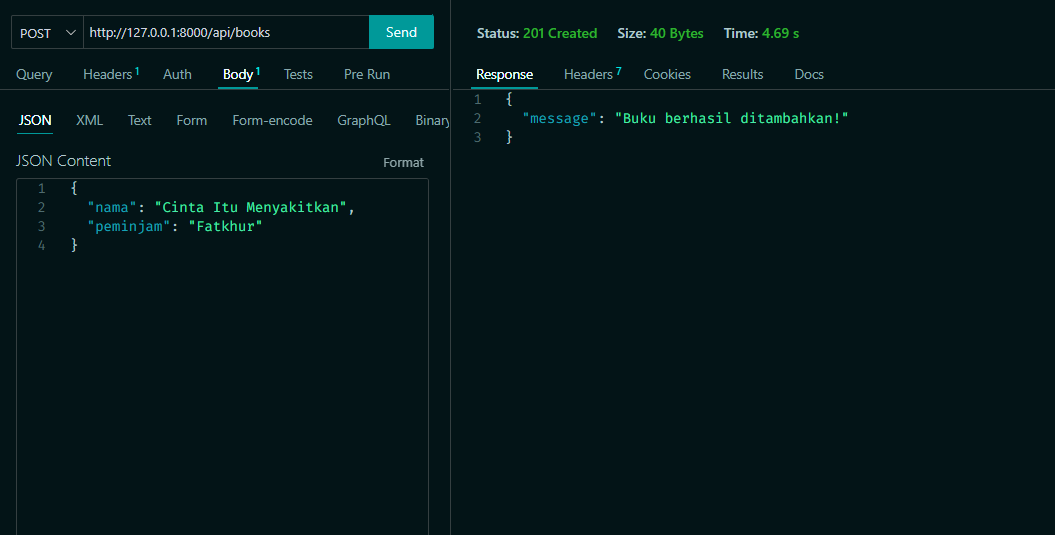
In Thunder Client, change the method to **POST**, add a JSON body like `{"name": "Laskar Pelangi", "borrower": "Budi"}`, and click **Send**. You'll see a success message.
### POST `/api/books`
Here we read data from the request body.
```php theme={null}
use Illuminate\Http\Request;
use Illuminate\Support\Str;
public function store(Request $request)
{
$request->validate([
'name' => 'required|string|unique:books',
'borrower' => 'required|string',
]);
Book::create([
'id' => Str::uuid()->toString(),
'name' => $request->name,
'borrower' => $request->borrower,
]);
return response()->json(['message' => 'Book added successfully!'], 201);
}
```
Laravel **automatically** parses the JSON request body. `$request->validate()` also immediately returns a 422 error if validation fails — no manual try/catch needed!
In Thunder Client, change the method to **POST**, add a JSON body like `{"name": "Laskar Pelangi", "borrower": "Budi"}`, and click **Send**. You'll see a success message.
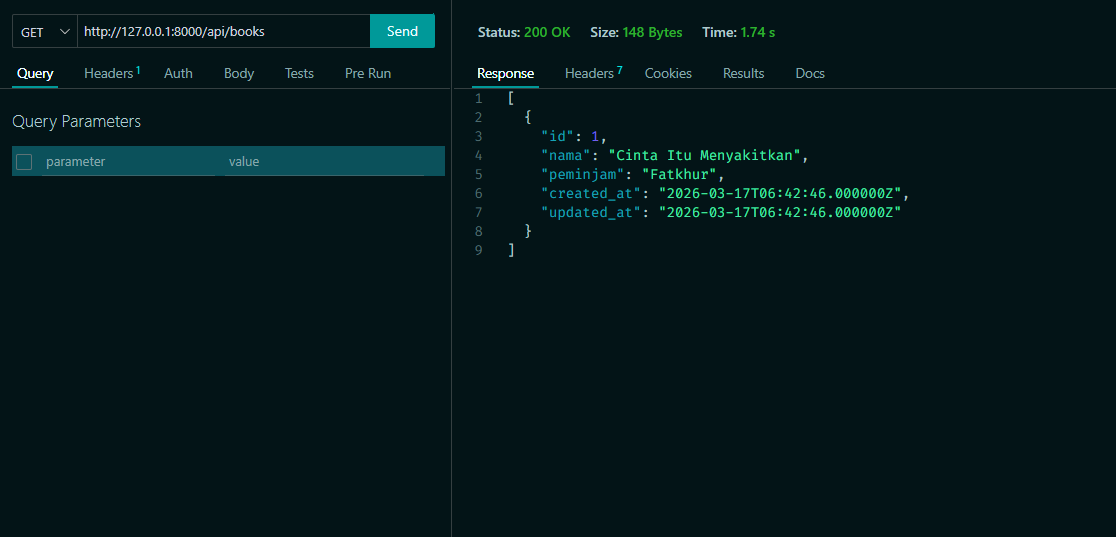
 Send a **GET** to `/api/books` again — you'll see the newly added book, complete with its generated UUID `id`.
 ### PUT `/api/books/{id}`
The route uses `{id}` as a dynamic segment. In Laravel, this parameter is automatically available as a controller method argument.
```php theme={null}
public function update(Request $request, string $id)
{
$book = Book::find($id);
if (!$book) {
return response()->json(['message' => 'Book not found'], 404);
}
$book->update($request->only(['name', 'borrower']));
return response()->json(['message' => 'Book updated successfully'], 200);
}
```
`Book::find($id)` is equivalent to `db.books.findUnique({ where: { id } })` in Prisma. `$request->only([...])` ensures only the fields we want are updated.
### DELETE `/api/books/{id}`
Same as PUT: find the book by id, then call `delete()`. Try implementing this one yourself!
### Cool-down
Has your API fully implemented CRUD? Are all book routes working, including **Delete**? In the next project we'll add better error handling and a route to fetch a single book by id.
***
# Refinement
Welcome to the final project! Your task is to refine the library API we've built by completing the steps below.
> Before uploading the project, delete the **vendor** folder and make sure `.env` is not included in the upload.
* **#1** Make sure the **DELETE** route works to delete a book by id.
* **#2** Add a **GET** route that returns a single book by id in the `show()` method.
* **#3** Add a status code to every response. Use:
`return response()->json(['message' => '...'], [status code]);`
| Status code | When to use |
| ----------- | ---------------------------------------------------- |
| 200 | Successfully returned data |
| 201 | Successfully created new data |
| 404 | Data not found |
| 422 | Validation failed (handled automatically by Laravel) |
| 500 | Server error |
For the full list, see [HTTP status codes](https://www.hostinger.com/id/tutorial/http-status-code).
* **#4** Create a separate **Form Request class** for cleaner validation:
```bash theme={null}
php artisan make:request StoreBookRequest
php artisan make:request UpdateBookRequest
```
```php theme={null}
// app/Http/Requests/StoreBookRequest.php
public function authorize(): bool
{
return true; // Set to true to allow the request
}
public function rules(): array
{
return [
'name' => 'required|string|unique:books',
'borrower' => 'required|string',
];
}
```
Then use it in the Controller:
```php theme={null}
use App\Http\Requests\StoreBookRequest;
public function store(StoreBookRequest $request)
{
// $request is already validated automatically before reaching here!
Book::create([
'id' => Str::uuid()->toString(),
'name' => $request->name,
'borrower' => $request->borrower,
]);
return response()->json(['message' => 'Book added successfully!'], 201);
}
```
* **#5** Handle exceptions with **try/catch** for unexpected errors:
```php theme={null}
public function store(StoreBookRequest $request)
{
try {
Book::create([
'id' => Str::uuid()->toString(),
'name' => $request->name,
'borrower' => $request->borrower,
]);
return response()->json(['message' => 'Book added successfully!'], 201);
} catch (\Exception $e) {
return response()->json(['message' => $e->getMessage()], 500);
}
}
```
Add your Github link or project on Google Drive, then the community will review and help together. Keep an eye on Discord for the latest updates!
### PUT `/api/books/{id}`
The route uses `{id}` as a dynamic segment. In Laravel, this parameter is automatically available as a controller method argument.
```php theme={null}
public function update(Request $request, string $id)
{
$book = Book::find($id);
if (!$book) {
return response()->json(['message' => 'Book not found'], 404);
}
$book->update($request->only(['name', 'borrower']));
return response()->json(['message' => 'Book updated successfully'], 200);
}
```
`Book::find($id)` is equivalent to `db.books.findUnique({ where: { id } })` in Prisma. `$request->only([...])` ensures only the fields we want are updated.
### DELETE `/api/books/{id}`
Same as PUT: find the book by id, then call `delete()`. Try implementing this one yourself!
### Cool-down
Has your API fully implemented CRUD? Are all book routes working, including **Delete**? In the next project we'll add better error handling and a route to fetch a single book by id.
***
# Refinement
Welcome to the final project! Your task is to refine the library API we've built by completing the steps below.
> Before uploading the project, delete the **vendor** folder and make sure `.env` is not included in the upload.
* **#1** Make sure the **DELETE** route works to delete a book by id.
* **#2** Add a **GET** route that returns a single book by id in the `show()` method.
* **#3** Add a status code to every response. Use:
`return response()->json(['message' => '...'], [status code]);`
| Status code | When to use |
| ----------- | ---------------------------------------------------- |
| 200 | Successfully returned data |
| 201 | Successfully created new data |
| 404 | Data not found |
| 422 | Validation failed (handled automatically by Laravel) |
| 500 | Server error |
For the full list, see [HTTP status codes](https://www.hostinger.com/id/tutorial/http-status-code).
* **#4** Create a separate **Form Request class** for cleaner validation:
```bash theme={null}
php artisan make:request StoreBookRequest
php artisan make:request UpdateBookRequest
```
```php theme={null}
// app/Http/Requests/StoreBookRequest.php
public function authorize(): bool
{
return true; // Set to true to allow the request
}
public function rules(): array
{
return [
'name' => 'required|string|unique:books',
'borrower' => 'required|string',
];
}
```
Then use it in the Controller:
```php theme={null}
use App\Http\Requests\StoreBookRequest;
public function store(StoreBookRequest $request)
{
// $request is already validated automatically before reaching here!
Book::create([
'id' => Str::uuid()->toString(),
'name' => $request->name,
'borrower' => $request->borrower,
]);
return response()->json(['message' => 'Book added successfully!'], 201);
}
```
* **#5** Handle exceptions with **try/catch** for unexpected errors:
```php theme={null}
public function store(StoreBookRequest $request)
{
try {
Book::create([
'id' => Str::uuid()->toString(),
'name' => $request->name,
'borrower' => $request->borrower,
]);
return response()->json(['message' => 'Book added successfully!'], 201);
} catch (\Exception $e) {
return response()->json(['message' => $e->getMessage()], 500);
}
}
```
Add your Github link or project on Google Drive, then the community will review and help together. Keep an eye on Discord for the latest updates!