> ## Documentation Index
> Fetch the complete documentation index at: https://docs.fydemy.com/llms.txt
> Use this file to discover all available pages before exploring further.
# Hello World!
Learning frontend is often the first step into web development. Instead of working in the terminal, you'll start by building things you can actually see — buttons, text, images, and layouts. Think of frontend as the part of a website that users interact with directly. This section is designed to be simple and straight to the point, but don't worry if some parts feel confusing at first — that's completely normal.
## Prerequisites
* Download an IDE (where we write code) from this link: [VSCode](https://code.visualstudio.com/download)
* After installing, run the file and follow the instructions
## Let's get started
### Open a project
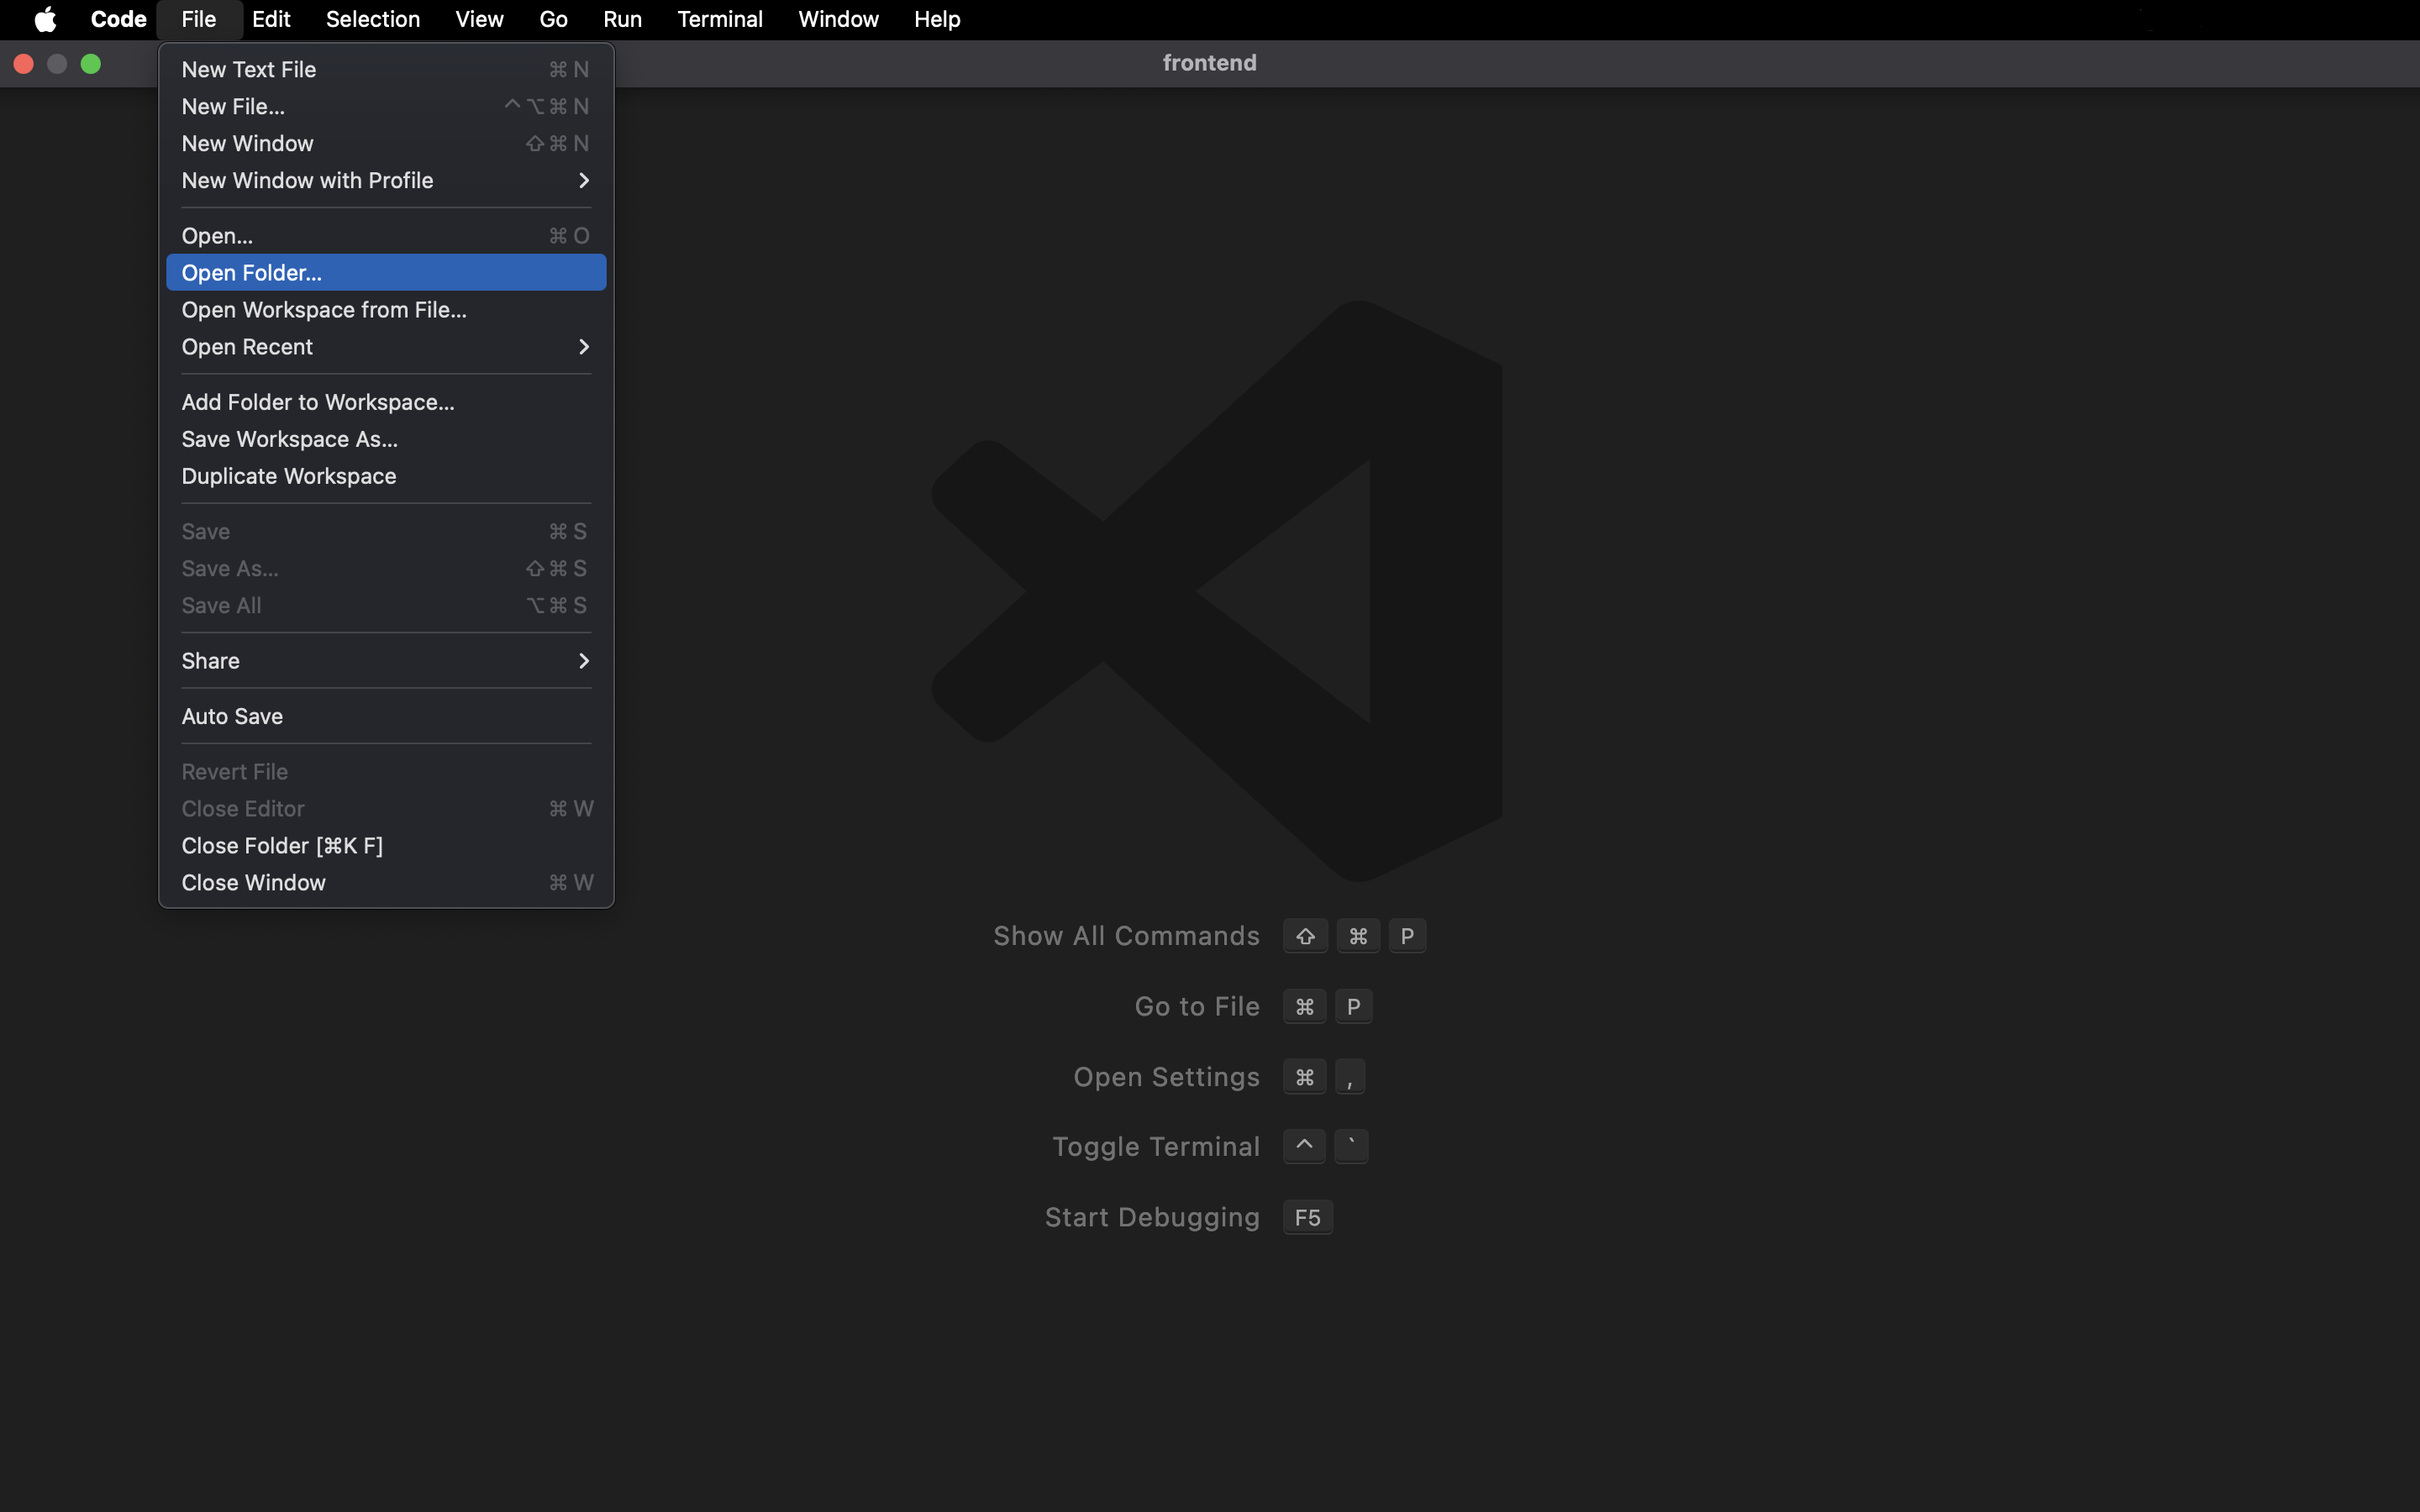
In Visual Studio Code, click the **File** menu in the top-left corner, then choose **Open Folder**. Create a new folder for this exercise—for example name it `frontend`.
### Create a new file
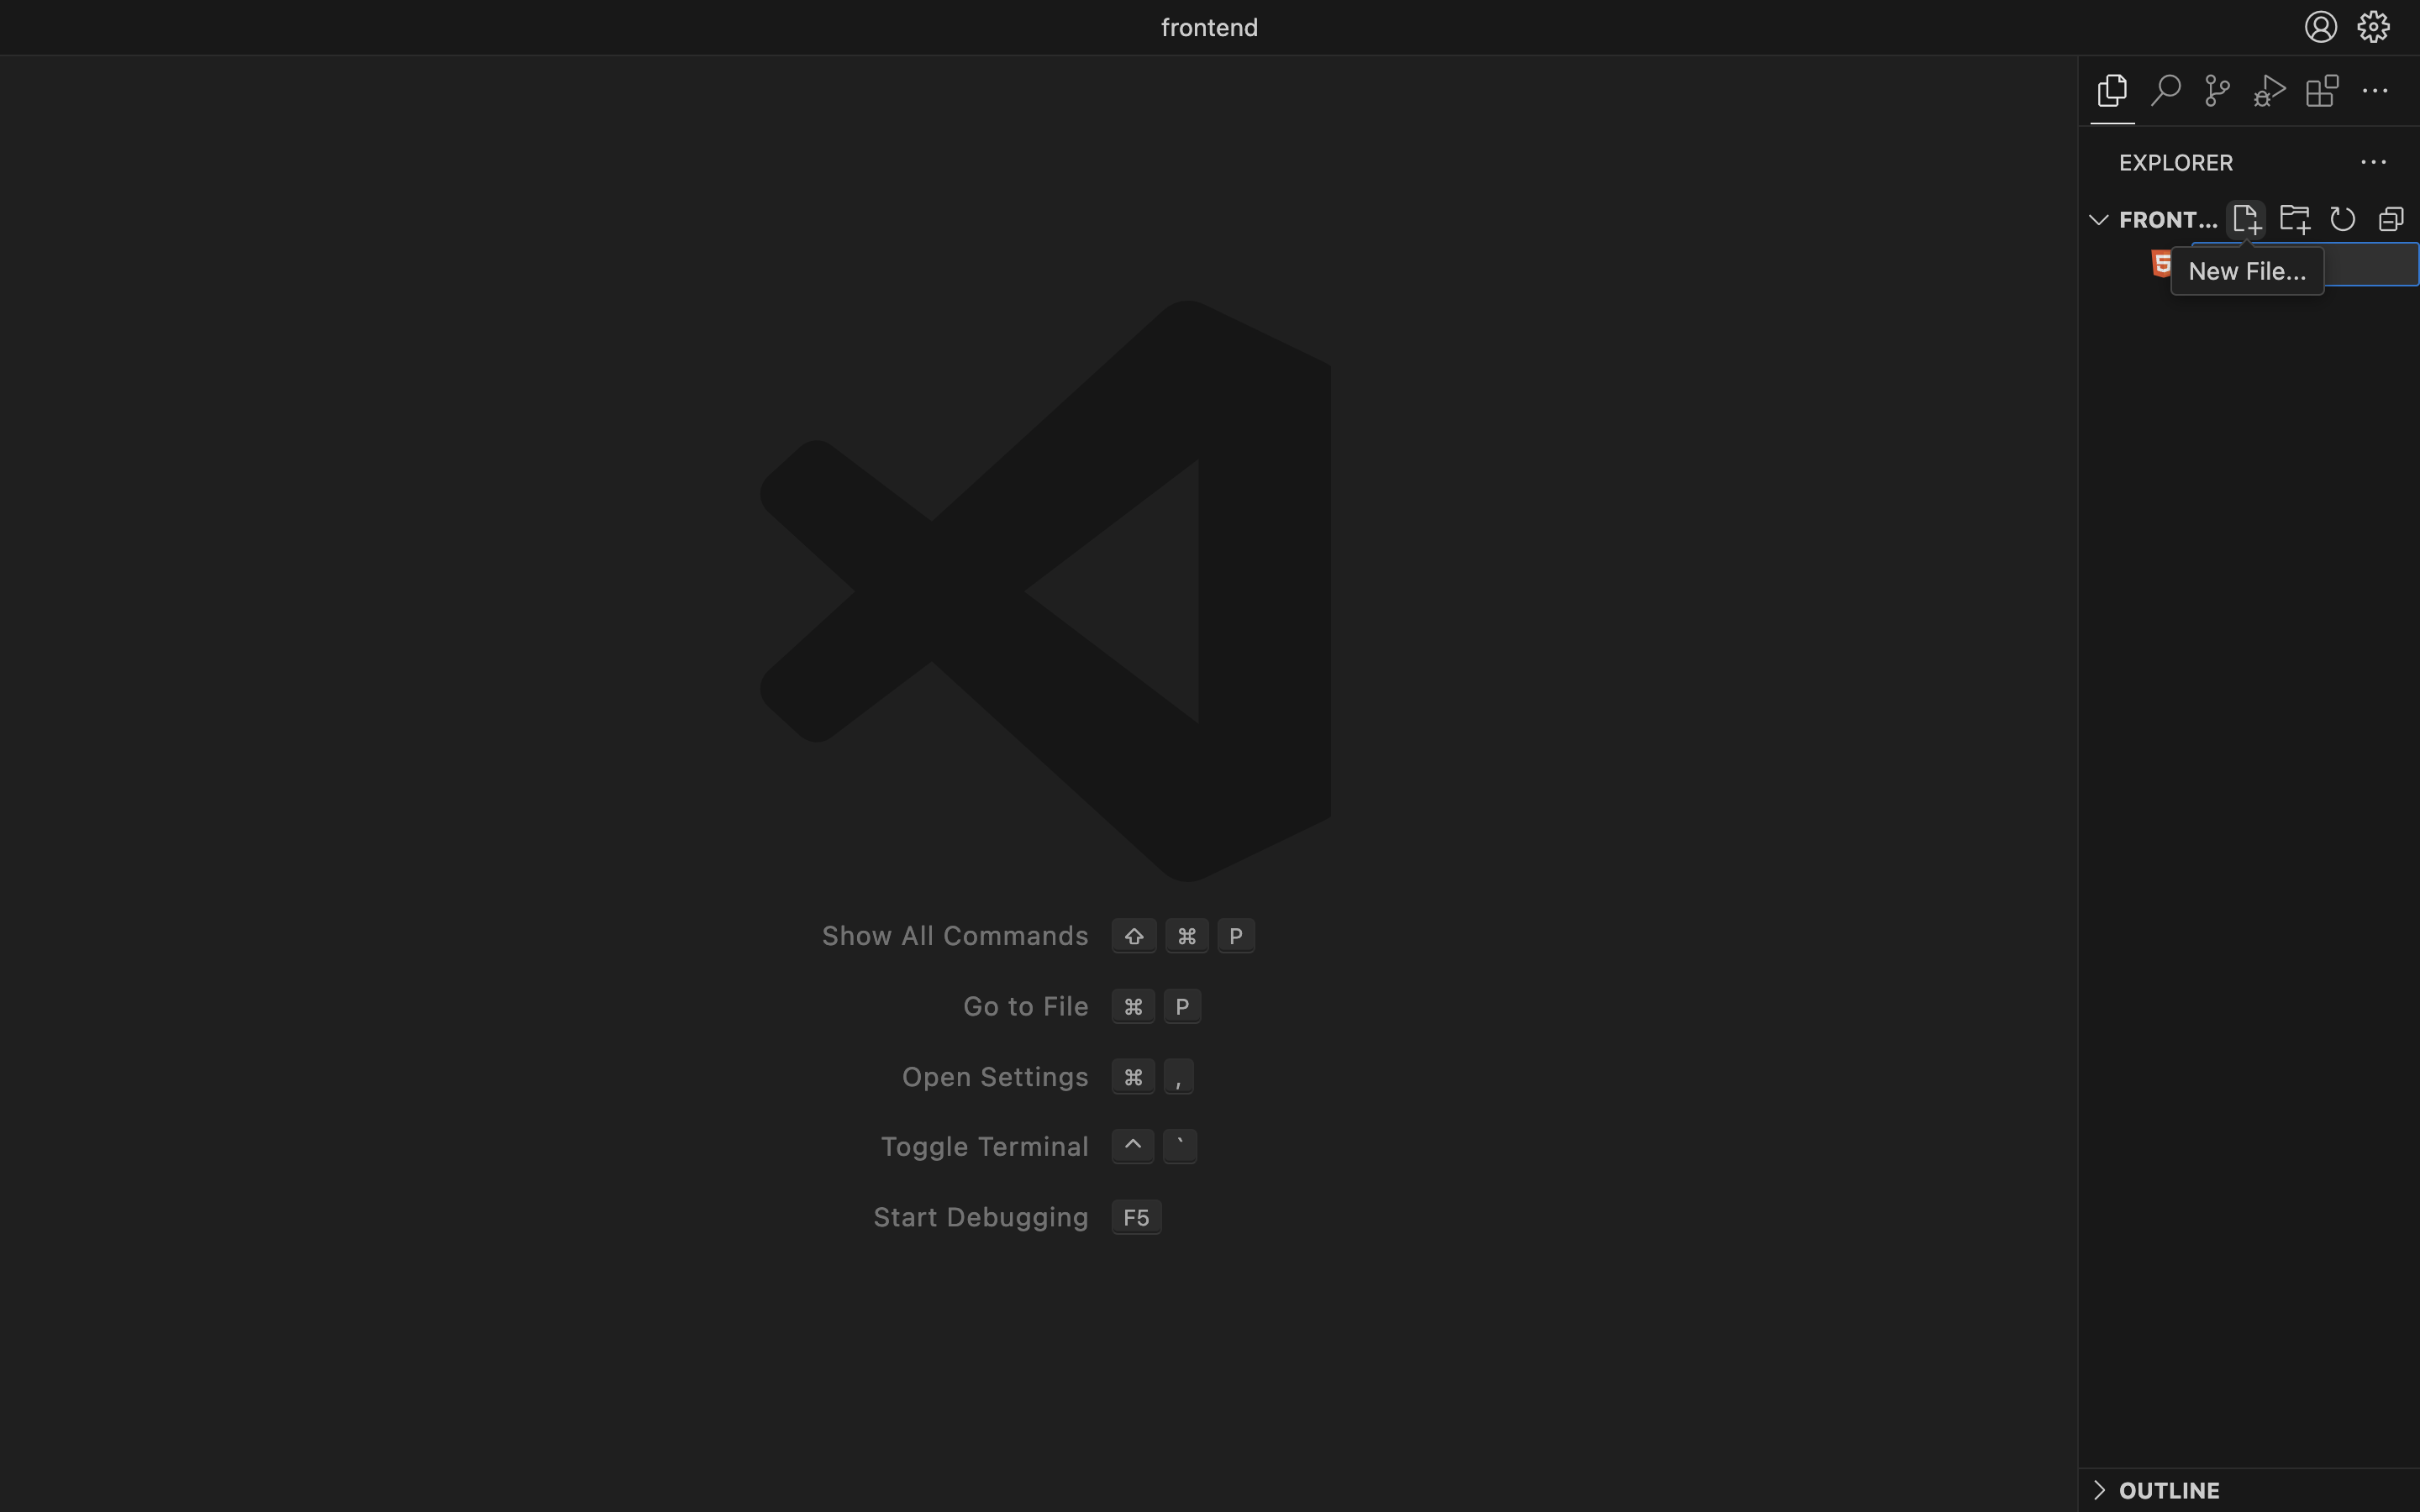
Click the add-file icon in the sidebar, then type `index.html`. Press Enter to create it. Note that websites generally have this file structure:
* **HTML (Hypertext Markup Language)** `*.html` — the skeleton for elements like headings, text, images, links, buttons, and so on
* **CSS (Cascading Style Sheets)** `*.css` — styling for HTML elements (font-size, color, font, margin, padding, etc.)
* **JavaScript** `*.js` — logic to make the site more interactive, dynamic, and to add functionality
For example:
* HTML creates a button (what exists on the page)
* CSS makes it look nice (what exists on the page)
* JavaScript makes it clickable (how it reacts)
## HTML
### Comments
```html theme={null}
```
Anything wrapped between `` is not executed by the program—it's only for notes or comments so you (or others) can understand the code.
### Tags
There are many HTML tags, each with a different purpose. See the [full list of tags](https://www.w3schools.com/tags/). There are two kinds of tags (elements) you should know:
**Pair tags**
```html theme={null}
content
```
Examples:
* `
This is a heading
`
* `
This is a paragraph
`
* `
This is a list item
` — and many more
**Self-closing tags**
```html theme={null}
```
Examples:
* `` for images
* `` for wrapper/container
* ` ` for line break — and many more
### Attributes
Attributes are configuration or options you can add to elements (tags). For example: **src**, **style**, and many others. See the [list of attributes](https://www.w3schools.com/tags/ref_attributes.asp).
* ``
* `
Welcome!
`
### HTML structure
```html theme={null}
Personal Portfolio
```
This is the basic structure required for every HTML page. You don't need to memorize it all at once — most developers rely on shortcuts like `! + Tab` in VSCode to generate it automatically. What matters is understanding that:
* `` contains information about the page
* `` contains what users will actually see
## CSS
Tired of only writing elements with no styling? Time to decorate them with CSS. There are **3 ways** to do it (the 2nd is recommended):
**1. Inline CSS (attribute)**
Easiest, but not recommended—it clutters your HTML when styles get complex and you have many elements.
```html theme={null}
Welcome!
```
**2. External CSS (recommended)**
As your project grows, separating CSS into its own file becomes important. It helps keep your code clean and easier to manage. That's why external CSS is the most commonly used approach in real-world projects.
Create a **new CSS file** the same way you created the HTML file—for example name it `style.css`. Then link it from your HTML; make sure the `href` matches your file name.
**Important:** Next, define a class name (e.g. `header`) in your CSS and use that name in the `class` attribute on the elements you want to style.
**index.html**
```html theme={null}
Personal Portfolio
```
In your CSS file, use the class name you defined, preceded by a dot (meaning “class”), then add properties like `text-align` and more inside curly braces. See the [list of CSS properties](https://www.w3schools.com/cssref/index.php).
**style.css**
```css theme={null}
.header {
text-align: center;
}
```
**3. Internal CSS**
Similar to external CSS but not recommended—keeping CSS in a separate file is usually clearer. Add a `
```
# Systematic thinking
Ever thought about how human logic can be expressed in code? It's possible, though limited—not like AI. Let's get familiar with…
## JavaScript
Did you know that by learning this one language you can become a fullstack web, mobile, desktop developer and more? No wonder it's one of the most popular languages. Want to go deeper?
### Standalone vs connected to HTML
JavaScript can be run in two ways: through HTML or on its own. How? Read on.
**Standalone**
JavaScript can be run with a runtime. Originally it needed HTML (like CSS), but now you can run it directly from the terminal with [Node.js](https://nodejs.org/en/download). Once installed, in the terminal run:
```bash theme={null}
node namafile.js
```
Example:
```bash theme={null}
node main.js
```
**Connected to HTML**
As with CSS, we import the file. Create a new file, e.g. `main.js`, then include it inside the `` tag.
```html theme={null}
Document
```
## Programming concepts
These are the basic concepts of a programming language, especially JavaScript. The same ideas apply to Python, Java, Go, etc.
### Comments
As in HTML, CSS, and most languages, you can write comments—the syntax is just different. Use `//`.
```javascript theme={null}
// This is a comment
```
### Variables
**Syntax**
Two keywords are commonly used to define variables that hold values of a given type: `let` and `const`.
**let**
Use for values that may change later. In this example, the value is updated from 10 to 12.
```javascript theme={null}
let age = 10;
age = 12;
```
**const**
Use for values that stay the same. If you try to change them, you'll get an error.
```javascript theme={null}
const name = "John";
name = "Dewi"; // This will cause an error
```
**Naming rules**
* **No spaces** — Wrong: `let nama lengkap = "john doe"`
* **Camel case** — Correct: `let fullName = "john doe"`
* **Snake case** — Correct: `let full_name = "john doe"`
### Data types
Values stored in variables have different types. Here are some common ones. For a full list, see [Data types in JavaScript](https://codingstudio.id/blog/tipe-data-javascript/).
**String**
Must be wrapped in single or double quotes, e.g. `"bla bla"`. In other words, text.
```javascript theme={null}
const text = "Welcome";
```
**Boolean**
Either **true** or **false** (or 1 for true, 0 for false). Often used for conditions or flags.
```javascript theme={null}
const isMarried = false;
```
**Integer**
Whole numbers like 8, 1, 3, 100, etc.
```javascript theme={null}
const year = 2025;
```
**Array**
Holds multiple values in one variable.
```javascript theme={null}
const container = ["joko", 19, true];
```
**Object**
Stores structured information with keys and values.
```javascript theme={null}
const user = {
username: "john doe",
age: 12,
isMarried: false,
};
```
### Conditionals
We can combine what we've learned to build more complex programs using conditionals (`if`) and logical operators.
**if**
You can use simple `if`, branching with `else` or `else if`, combine them, or nest `if` inside `if`.
```javascript theme={null}
if (true) {
// action
}
```
**Logical operators**
Here are some examples. Say we have `const atSchool = false; const age = 3`:
* `!atSchool` — **!** is negation (the opposite). So this is **true**.
* `atSchool && age > 1` — **&&** means "and". Both must be true for the whole expression to be true; if either is false, the whole thing is **false**.
* `atSchool || age > 1` — **||** means "or". If at least one is true, the whole expression is **true**.
Once you get this, try to guess the output of:
```javascript theme={null}
const isMarried = false;
const age = 28;
if (isMarried) {
console.log("congrats");
} else if (!isMarried && age > 30) {
console.log("hope you find a match");
} else {
console.log("hang in there");
}
```
### Functions
You know functions from math—they take an input and give an output. In code, functions wrap a set of statements in one place and can take parameters (like f(x) where x is the parameter), use those values, and return a result. In JavaScript there are built-in functions and user-defined functions.
**Built-in functions**
JavaScript has many built-in functions—try them on variables, objects, classes, arrays, etc. Below is an example using `concat`. When you use libraries, you'll use even more built-ins.
```javascript theme={null}
const cityName = "DKI";
cityName.concat("Jakarta");
```
**User-defined functions**
You can define your own functions. You can have more than one parameter, and the function can **return** a value or not (e.g. it might only call `console.log`).
```javascript theme={null}
function add(a, b) {
return a + b;
}
```
## DOM
The DOM (Document Object Model) is how JavaScript manipulates elements and makes your site interactive. Make sure you're comfortable with the concepts above first.
### Step 1: Selecting elements
You can turn HTML elements into variables. `document` is a global object with many uses; one of them is selecting elements. `querySelector()` is one of its methods.
```javascript theme={null}
const title = document.querySelector("h1"); // select by tag name
const header = document.querySelector(".header"); // select by class
```
### Step 2: Adding events
Next, attach events or behavior to elements. Here we use the `click` event: when the heading is clicked, an alert appears. Note that `addEventListener(event, function)` takes two arguments: the **event** and the **function**.
```javascript theme={null}
const title = document.querySelector(".header"); // step 1
title.addEventListener("click", function () {
alert("Welcome!");
});
```
The DOM can feel confusing at first, but you can think of it as a bridge between your HTML and JavaScript. It allows JavaScript to “see” and “control” elements on your page.
## Ready?
Let's put this into practice by building the project we've designed so you can understand it better!
***
# Layouting
For this project, you're expected to already understand the basics.
## Level 1: Text procedure
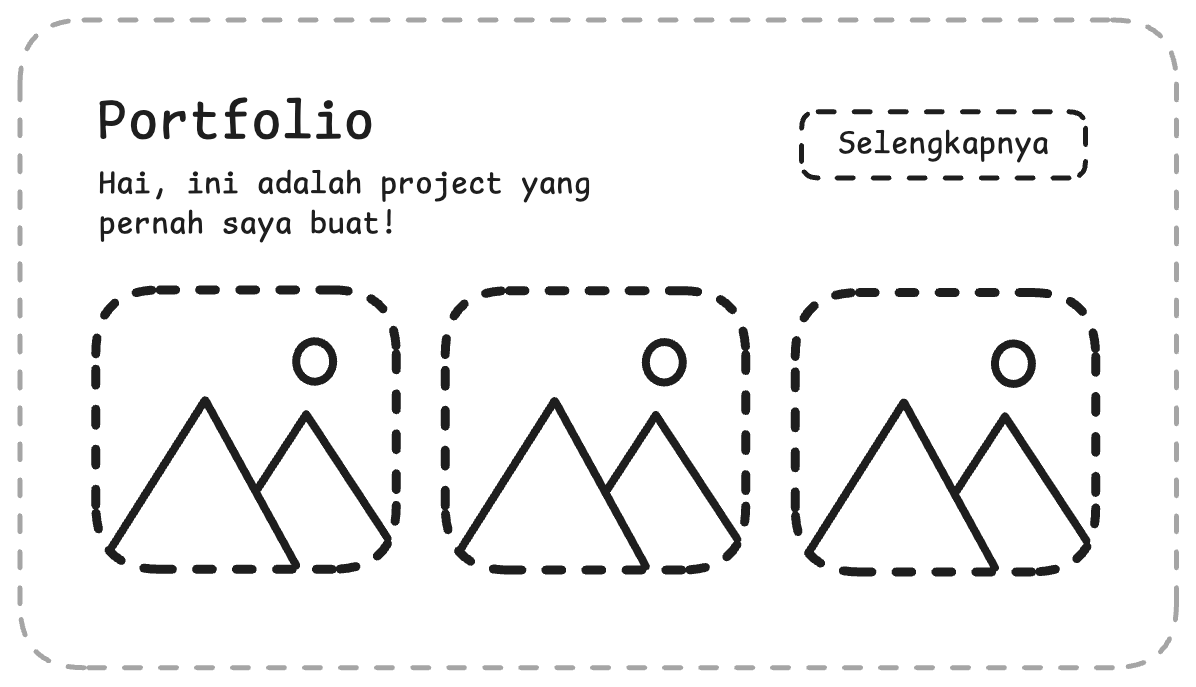
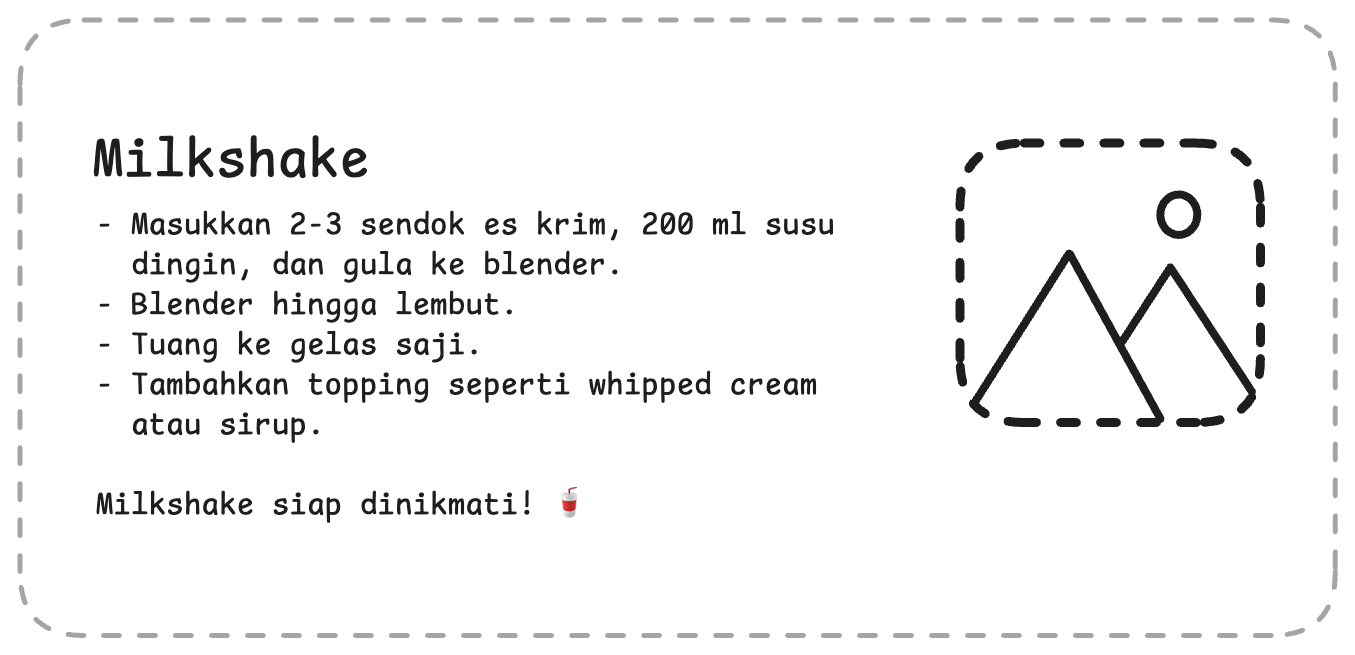
Here you need to understand HTML concepts: list elements, headings, images, and CSS: layout, padding, and border. This is the layout prototype—good luck!
### Tips and requirements
* You can use the `float` or `flex` property in CSS
* Include images with `` — you can use a local file (in the same folder) or a URL from the web
* Use list elements in HTML, for example:
```html theme={null}
List 1
List 2
```
## Level 2: Portfolio section
Here you need to combine HTML (buttons), CSS (layout), and JavaScript (DOM). This is the layout prototype—good luck!
### Tips and requirements
* When the "See more" (or similar) button is clicked, it should go to your Instagram page
* Match the layout exactly. You can use **flexbox** in CSS:
```html theme={null}
```
* Use the `window` object to navigate to another page in your click handler: `window.location.href = "https://instagram.com/@username"` inside the event function
Add your Github link or project in Google Drive then the community will review
and help you together. Please stay tuned on Discord to see the latest updates!
 ### Create a new file
Click the add-file icon in the sidebar, then type `index.html`. Press Enter to create it. Note that websites generally have this file structure:
* **HTML (Hypertext Markup Language)** `*.html` — the skeleton for elements like headings, text, images, links, buttons, and so on
* **CSS (Cascading Style Sheets)** `*.css` — styling for HTML elements (font-size, color, font, margin, padding, etc.)
* **JavaScript** `*.js` — logic to make the site more interactive, dynamic, and to add functionality
For example:
* HTML creates a button (what exists on the page)
* CSS makes it look nice (what exists on the page)
* JavaScript makes it clickable (how it reacts)
### Create a new file
Click the add-file icon in the sidebar, then type `index.html`. Press Enter to create it. Note that websites generally have this file structure:
* **HTML (Hypertext Markup Language)** `*.html` — the skeleton for elements like headings, text, images, links, buttons, and so on
* **CSS (Cascading Style Sheets)** `*.css` — styling for HTML elements (font-size, color, font, margin, padding, etc.)
* **JavaScript** `*.js` — logic to make the site more interactive, dynamic, and to add functionality
For example:
* HTML creates a button (what exists on the page)
* CSS makes it look nice (what exists on the page)
* JavaScript makes it clickable (how it reacts)
 ## HTML
### Comments
```html theme={null}
```
Anything wrapped between `` is not executed by the program—it's only for notes or comments so you (or others) can understand the code.
### Tags
There are many HTML tags, each with a different purpose. See the [full list of tags](https://www.w3schools.com/tags/). There are two kinds of tags (elements) you should know:
**Pair tags**
```html theme={null}
## HTML
### Comments
```html theme={null}
```
Anything wrapped between `` is not executed by the program—it's only for notes or comments so you (or others) can understand the code.
### Tags
There are many HTML tags, each with a different purpose. See the [full list of tags](https://www.w3schools.com/tags/). There are two kinds of tags (elements) you should know:
**Pair tags**
```html theme={null}
 `
* `
`
* ` ## Level 2: Portfolio section
Here you need to combine HTML (buttons), CSS (layout), and JavaScript (DOM). This is the layout prototype—good luck!
### Tips and requirements
* When the "See more" (or similar) button is clicked, it should go to your Instagram page
* Match the layout exactly. You can use **flexbox** in CSS:
```html theme={null}
## Level 2: Portfolio section
Here you need to combine HTML (buttons), CSS (layout), and JavaScript (DOM). This is the layout prototype—good luck!
### Tips and requirements
* When the "See more" (or similar) button is clicked, it should go to your Instagram page
* Match the layout exactly. You can use **flexbox** in CSS:
```html theme={null}