> ## Documentation Index
> Fetch the complete documentation index at: https://docs.fydemy.com/llms.txt
> Use this file to discover all available pages before exploring further.
# The Kitchen - Express
After learning basic frontend with HTML, CSS, and JavaScript, have you ever wondered how sites like Tokopedia, Instagram, TikTok, and others work? It’s a lot, right? Can we do it with just frontend? We could, but it would stay static—we wouldn’t see updated stories, other people’s posts, and so on.
Here things can feel a bit dry because we work with databases, data, logic, and APIs. This is also where your programming understanding gets put to the test!
Think of the **backend** as the kitchen: it prepares the “food” that waiters (the API) deliver to the customers (the frontend).
That’s the idea. To get a better feel for it, let’s jump into practice.
## Backend
This is where the programming logic lives. We’ll use **JavaScript** here. The backend covers the database, API routing, business logic, and more.
### Database
Where do you think sites like Instagram store user data and posts? In Excel, Word, Notepad? You could, but that wouldn’t scale. Instead we use **databases**—like tables—and they come in **relational** and **non-relational** types.
* **Relational** — You define column names and data types (the structure). Examples: MySQL, PostgreSQL, etc.
* **Non-relational** — No fixed schema; you insert data without defining structure upfront, often in an object/document form. Examples include MongoDB.
### Setting up the database
* Download [XAMPP](https://www.apachefriends.org/). Run the installer and accept the default settings.
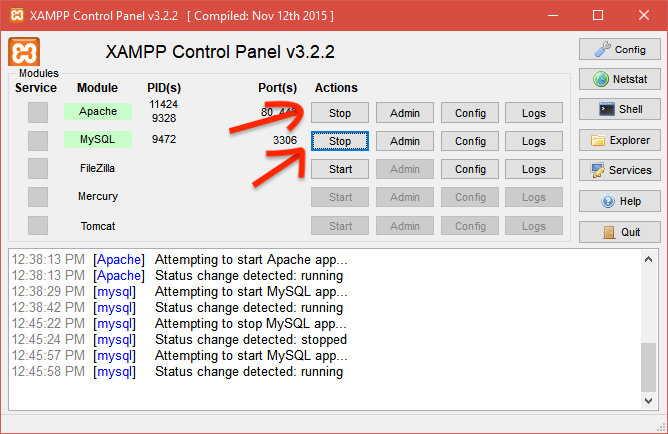
* After installation, open the app and click **Start** for **Apache** and **MySQL**.
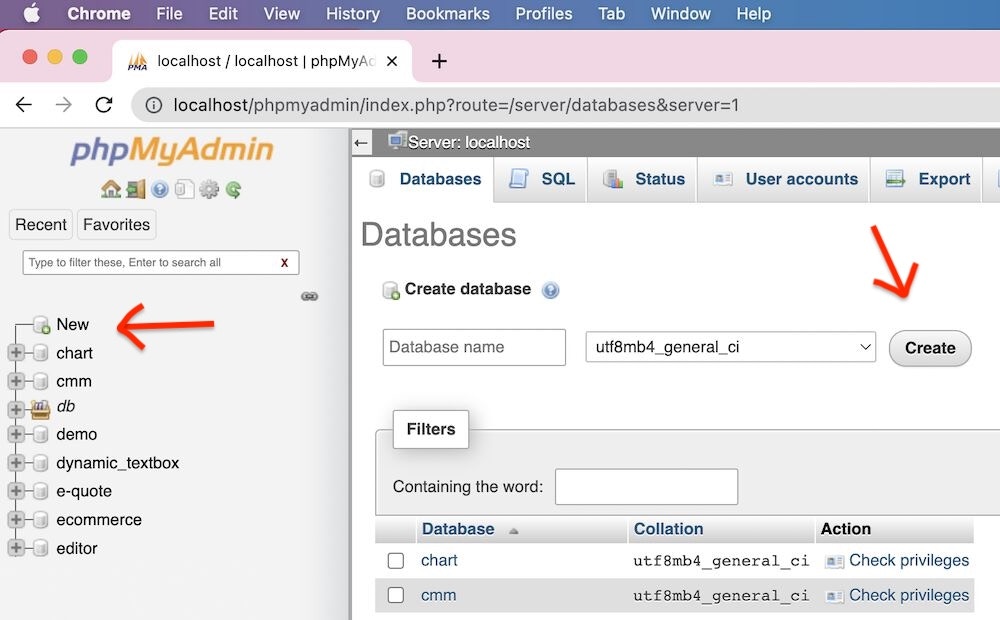
 * Open `localhost/phpmyadmin` in your browser. Create a new database by clicking **New** in the sidebar, entering a name, then clicking **Create**.
 ### API routing
Complex apps usually have many features—like Instagram: upload, edit, delete, view posts, view profile, algorithms, etc. We split those into **routes**. For example:
* **GET** `/posts` — list/view posts
* **PUT** `/posts/{postId}` — update a post by ID
### How do we run it?
Install [Node.js](https://nodejs.org/en/download) first. We’ll use **Express.js** to handle the API and **Prisma** to work with the database.
***
# Node.js
After installing Node.js, create a new folder and open a terminal. Run:
```bash theme={null}
npm init -y
```
What's NPM? When you install Node.js, **NPM (Node Package Manager)** is installed too—it's the package manager for Node. Want to see all available packages? Check [npmjs.com](https://npmjs.com). There you'll find tons of libraries you can use in your projects. The command above **initializes** your project and creates a `package.json` file. The `-y` flag uses default configuration.
## Fundamentals
### Installing libraries
To install a package, use:
```bash theme={null}
npm install [package-name]
```
Example:
```bash theme={null}
npm install express
```
For packages like **prisma** that you only need during **development**, use the `--save-dev` flag so they're added as dev dependencies:
```bash theme={null}
npm install prisma --save-dev
```
You can also install packages **globally** with the `-g` flag so you can run them from the terminal:
```bash theme={null}
npm install -g nodemon
```
Then run:
```bash theme={null}
nodemon namafile.js
```
In `package.json`, the `name` property defaults to your folder name. The **express** package appears under `dependencies` and **prisma** under `devDependencies`:
```json theme={null}
{
"name": "academy",
"version": "1.0.0",
"main": "index.js",
"scripts": {
"test": "echo \"Error: no test specified\" && exit 1"
},
"keywords": [],
"author": "",
"license": "ISC",
"description": "",
"dependencies": {
"express": "^4.21.2"
},
"devDependencies": {
"prisma": "^6.2.0"
}
}
```
### Export & import
**Default export**
**\[Export]** — Typically used for your own functions or variables:
```javascript theme={null}
const age = 10;
module.exports = age;
```
**\[Import]** — After installing express (or any package) or when you have a file that exports with `module.exports`, you can import like this:
```javascript theme={null}
const express = require('express');
const age = require('namafile');
```
### Running the program
**Normal way**
```bash theme={null}
node namafile.js
```
**Using a script in package.json**
Add a script in the `scripts` property—e.g. `start`—and set its value to the command above:
```json theme={null}
{
"name": "academy",
"version": "1.0.0",
"main": "index.js",
"scripts": {
"test": "echo \"Error: no test specified\" && exit 1",
"start": "node namefile.js"
},
"keywords": [],
"author": "",
"license": "ISC",
"description": ""
}
```
**Using nodemon**
If you use the normal `node` command, you have to rerun it every time the file changes. With **nodemon**, the process restarts automatically when you edit the file:
```bash theme={null}
nodemon namafile.js
```
> You can add this as a script in `package.json` too if you want a custom command.
### .env
The `.env` file is one of the most important files for storing **secret variables**. Values live on the server, not in your code, so they stay secure—e.g. database connection URL, port, API keys.
Install the dotenv library:
```bash theme={null}
npm i dotenv
```
**.env**
```
DB_PASSWORD=admin_123
```
**index.js**
```javascript theme={null}
const dotenv = require('dotenv');
dotenv.config();
console.log(process.env.DB_PASSWORD);
```
Install the library first so you can load and use these values. The format in `.env` is: `NAME_IN_CAPS=value` (often all caps for the key).
In the file where you need them (e.g. `index.js`), require **dotenv** and call `dotenv.config()`. Then access variables with `process.env.VARIABLE_NAME`.
***
# Library
There's an old-fashioned library that could use an update. You have an idea: build a web app so book lending is tracked automatically and digitally. You could use Google Sheets—but we can build something simpler and minimal, with only the features we need, instead of all the menus and complexity of a spreadsheet. Curious how? Let's go!
## Initial overview
This continues from the **syntax** module. Make sure you've already set things up: nodemon, Prisma, Express, dotenv. Here's the workflow structure for our API:
### API routing
Complex apps usually have many features—like Instagram: upload, edit, delete, view posts, view profile, algorithms, etc. We split those into **routes**. For example:
* **GET** `/posts` — list/view posts
* **PUT** `/posts/{postId}` — update a post by ID
### How do we run it?
Install [Node.js](https://nodejs.org/en/download) first. We’ll use **Express.js** to handle the API and **Prisma** to work with the database.
***
# Node.js
After installing Node.js, create a new folder and open a terminal. Run:
```bash theme={null}
npm init -y
```
What's NPM? When you install Node.js, **NPM (Node Package Manager)** is installed too—it's the package manager for Node. Want to see all available packages? Check [npmjs.com](https://npmjs.com). There you'll find tons of libraries you can use in your projects. The command above **initializes** your project and creates a `package.json` file. The `-y` flag uses default configuration.
## Fundamentals
### Installing libraries
To install a package, use:
```bash theme={null}
npm install [package-name]
```
Example:
```bash theme={null}
npm install express
```
For packages like **prisma** that you only need during **development**, use the `--save-dev` flag so they're added as dev dependencies:
```bash theme={null}
npm install prisma --save-dev
```
You can also install packages **globally** with the `-g` flag so you can run them from the terminal:
```bash theme={null}
npm install -g nodemon
```
Then run:
```bash theme={null}
nodemon namafile.js
```
In `package.json`, the `name` property defaults to your folder name. The **express** package appears under `dependencies` and **prisma** under `devDependencies`:
```json theme={null}
{
"name": "academy",
"version": "1.0.0",
"main": "index.js",
"scripts": {
"test": "echo \"Error: no test specified\" && exit 1"
},
"keywords": [],
"author": "",
"license": "ISC",
"description": "",
"dependencies": {
"express": "^4.21.2"
},
"devDependencies": {
"prisma": "^6.2.0"
}
}
```
### Export & import
**Default export**
**\[Export]** — Typically used for your own functions or variables:
```javascript theme={null}
const age = 10;
module.exports = age;
```
**\[Import]** — After installing express (or any package) or when you have a file that exports with `module.exports`, you can import like this:
```javascript theme={null}
const express = require('express');
const age = require('namafile');
```
### Running the program
**Normal way**
```bash theme={null}
node namafile.js
```
**Using a script in package.json**
Add a script in the `scripts` property—e.g. `start`—and set its value to the command above:
```json theme={null}
{
"name": "academy",
"version": "1.0.0",
"main": "index.js",
"scripts": {
"test": "echo \"Error: no test specified\" && exit 1",
"start": "node namefile.js"
},
"keywords": [],
"author": "",
"license": "ISC",
"description": ""
}
```
**Using nodemon**
If you use the normal `node` command, you have to rerun it every time the file changes. With **nodemon**, the process restarts automatically when you edit the file:
```bash theme={null}
nodemon namafile.js
```
> You can add this as a script in `package.json` too if you want a custom command.
### .env
The `.env` file is one of the most important files for storing **secret variables**. Values live on the server, not in your code, so they stay secure—e.g. database connection URL, port, API keys.
Install the dotenv library:
```bash theme={null}
npm i dotenv
```
**.env**
```
DB_PASSWORD=admin_123
```
**index.js**
```javascript theme={null}
const dotenv = require('dotenv');
dotenv.config();
console.log(process.env.DB_PASSWORD);
```
Install the library first so you can load and use these values. The format in `.env` is: `NAME_IN_CAPS=value` (often all caps for the key).
In the file where you need them (e.g. `index.js`), require **dotenv** and call `dotenv.config()`. Then access variables with `process.env.VARIABLE_NAME`.
***
# Library
There's an old-fashioned library that could use an update. You have an idea: build a web app so book lending is tracked automatically and digitally. You could use Google Sheets—but we can build something simpler and minimal, with only the features we need, instead of all the menus and complexity of a spreadsheet. Curious how? Let's go!
## Initial overview
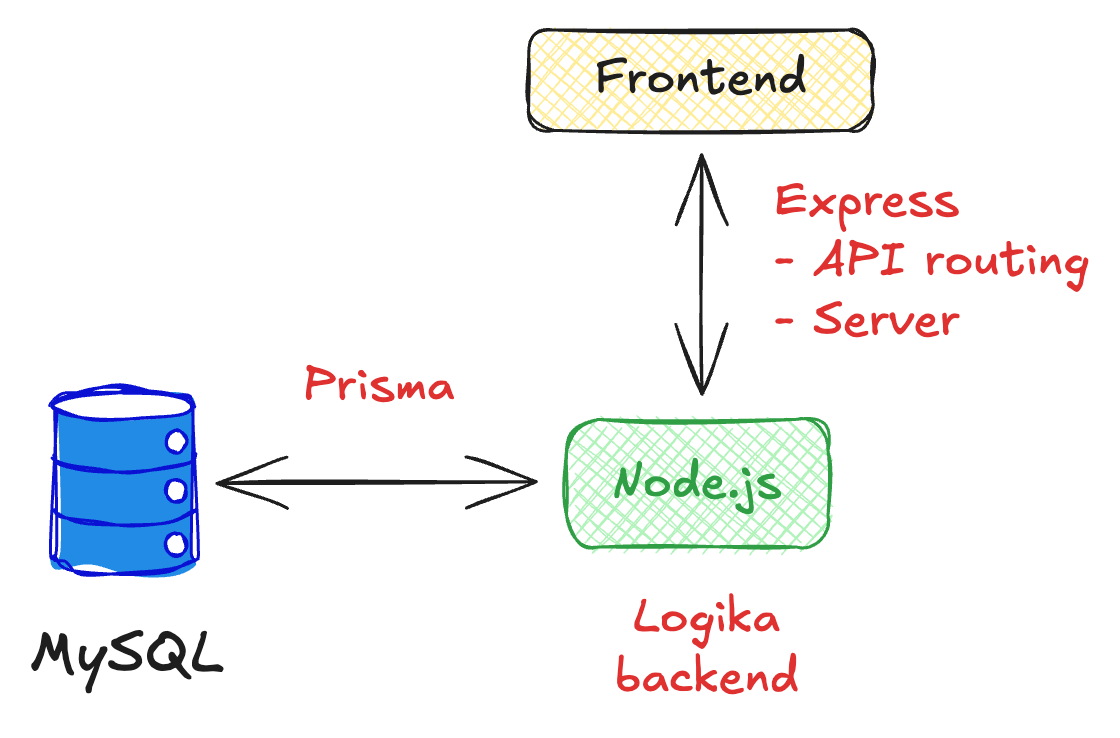
This continues from the **syntax** module. Make sure you've already set things up: nodemon, Prisma, Express, dotenv. Here's the workflow structure for our API:
 ## Ready?
### Express setup
Create a new file, e.g. `index.js`, and a `.env` file in the same folder (e.g. a folder named `library`).
```
library
├── node_modules
├── index.js
├── package.json
├── package-lock.json
└── .env
```
**.env**
```
APP_PORT=3000
```
**index.js**
```javascript theme={null}
const express = require('express');
const dotenv = require('dotenv');
dotenv.config();
const app = express();
app.listen(process.env.APP_PORT, () => {
console.log('Server is running...');
});
```
Run with:
```bash theme={null}
nodemon index.js
```
or:
```bash theme={null}
nodemon .
```
Then open your browser and go to `localhost:3000`. Nothing shows yet because we haven't defined any routes, but the server is up.
Add a route:
```javascript theme={null}
app.get('/', (req, res) => {
res.send('Hello World');
});
```
Here we tell Express: for the `/` (root) route, use this handler. It receives two parameters: **req** (request) and **res** (response). We use **res** to send output. Refresh the browser and you'll see "Hello World". Yes, it's more setup than plain HTML—we'll see the benefits soon.
### Prisma setup
Prisma lets you work with the database in a simple, type-safe way. First, run:
```bash theme={null}
npx prisma init
```
New folders and files appear, and `.env` is updated (that's normal—it's Prisma's initial setup). For a better experience, install the **Prisma** extension in VS Code for syntax highlighting and autocomplete in `.prisma` files.
## Ready?
### Express setup
Create a new file, e.g. `index.js`, and a `.env` file in the same folder (e.g. a folder named `library`).
```
library
├── node_modules
├── index.js
├── package.json
├── package-lock.json
└── .env
```
**.env**
```
APP_PORT=3000
```
**index.js**
```javascript theme={null}
const express = require('express');
const dotenv = require('dotenv');
dotenv.config();
const app = express();
app.listen(process.env.APP_PORT, () => {
console.log('Server is running...');
});
```
Run with:
```bash theme={null}
nodemon index.js
```
or:
```bash theme={null}
nodemon .
```
Then open your browser and go to `localhost:3000`. Nothing shows yet because we haven't defined any routes, but the server is up.
Add a route:
```javascript theme={null}
app.get('/', (req, res) => {
res.send('Hello World');
});
```
Here we tell Express: for the `/` (root) route, use this handler. It receives two parameters: **req** (request) and **res** (response). We use **res** to send output. Refresh the browser and you'll see "Hello World". Yes, it's more setup than plain HTML—we'll see the benefits soon.
### Prisma setup
Prisma lets you work with the database in a simple, type-safe way. First, run:
```bash theme={null}
npx prisma init
```
New folders and files appear, and `.env` is updated (that's normal—it's Prisma's initial setup). For a better experience, install the **Prisma** extension in VS Code for syntax highlighting and autocomplete in `.prisma` files.
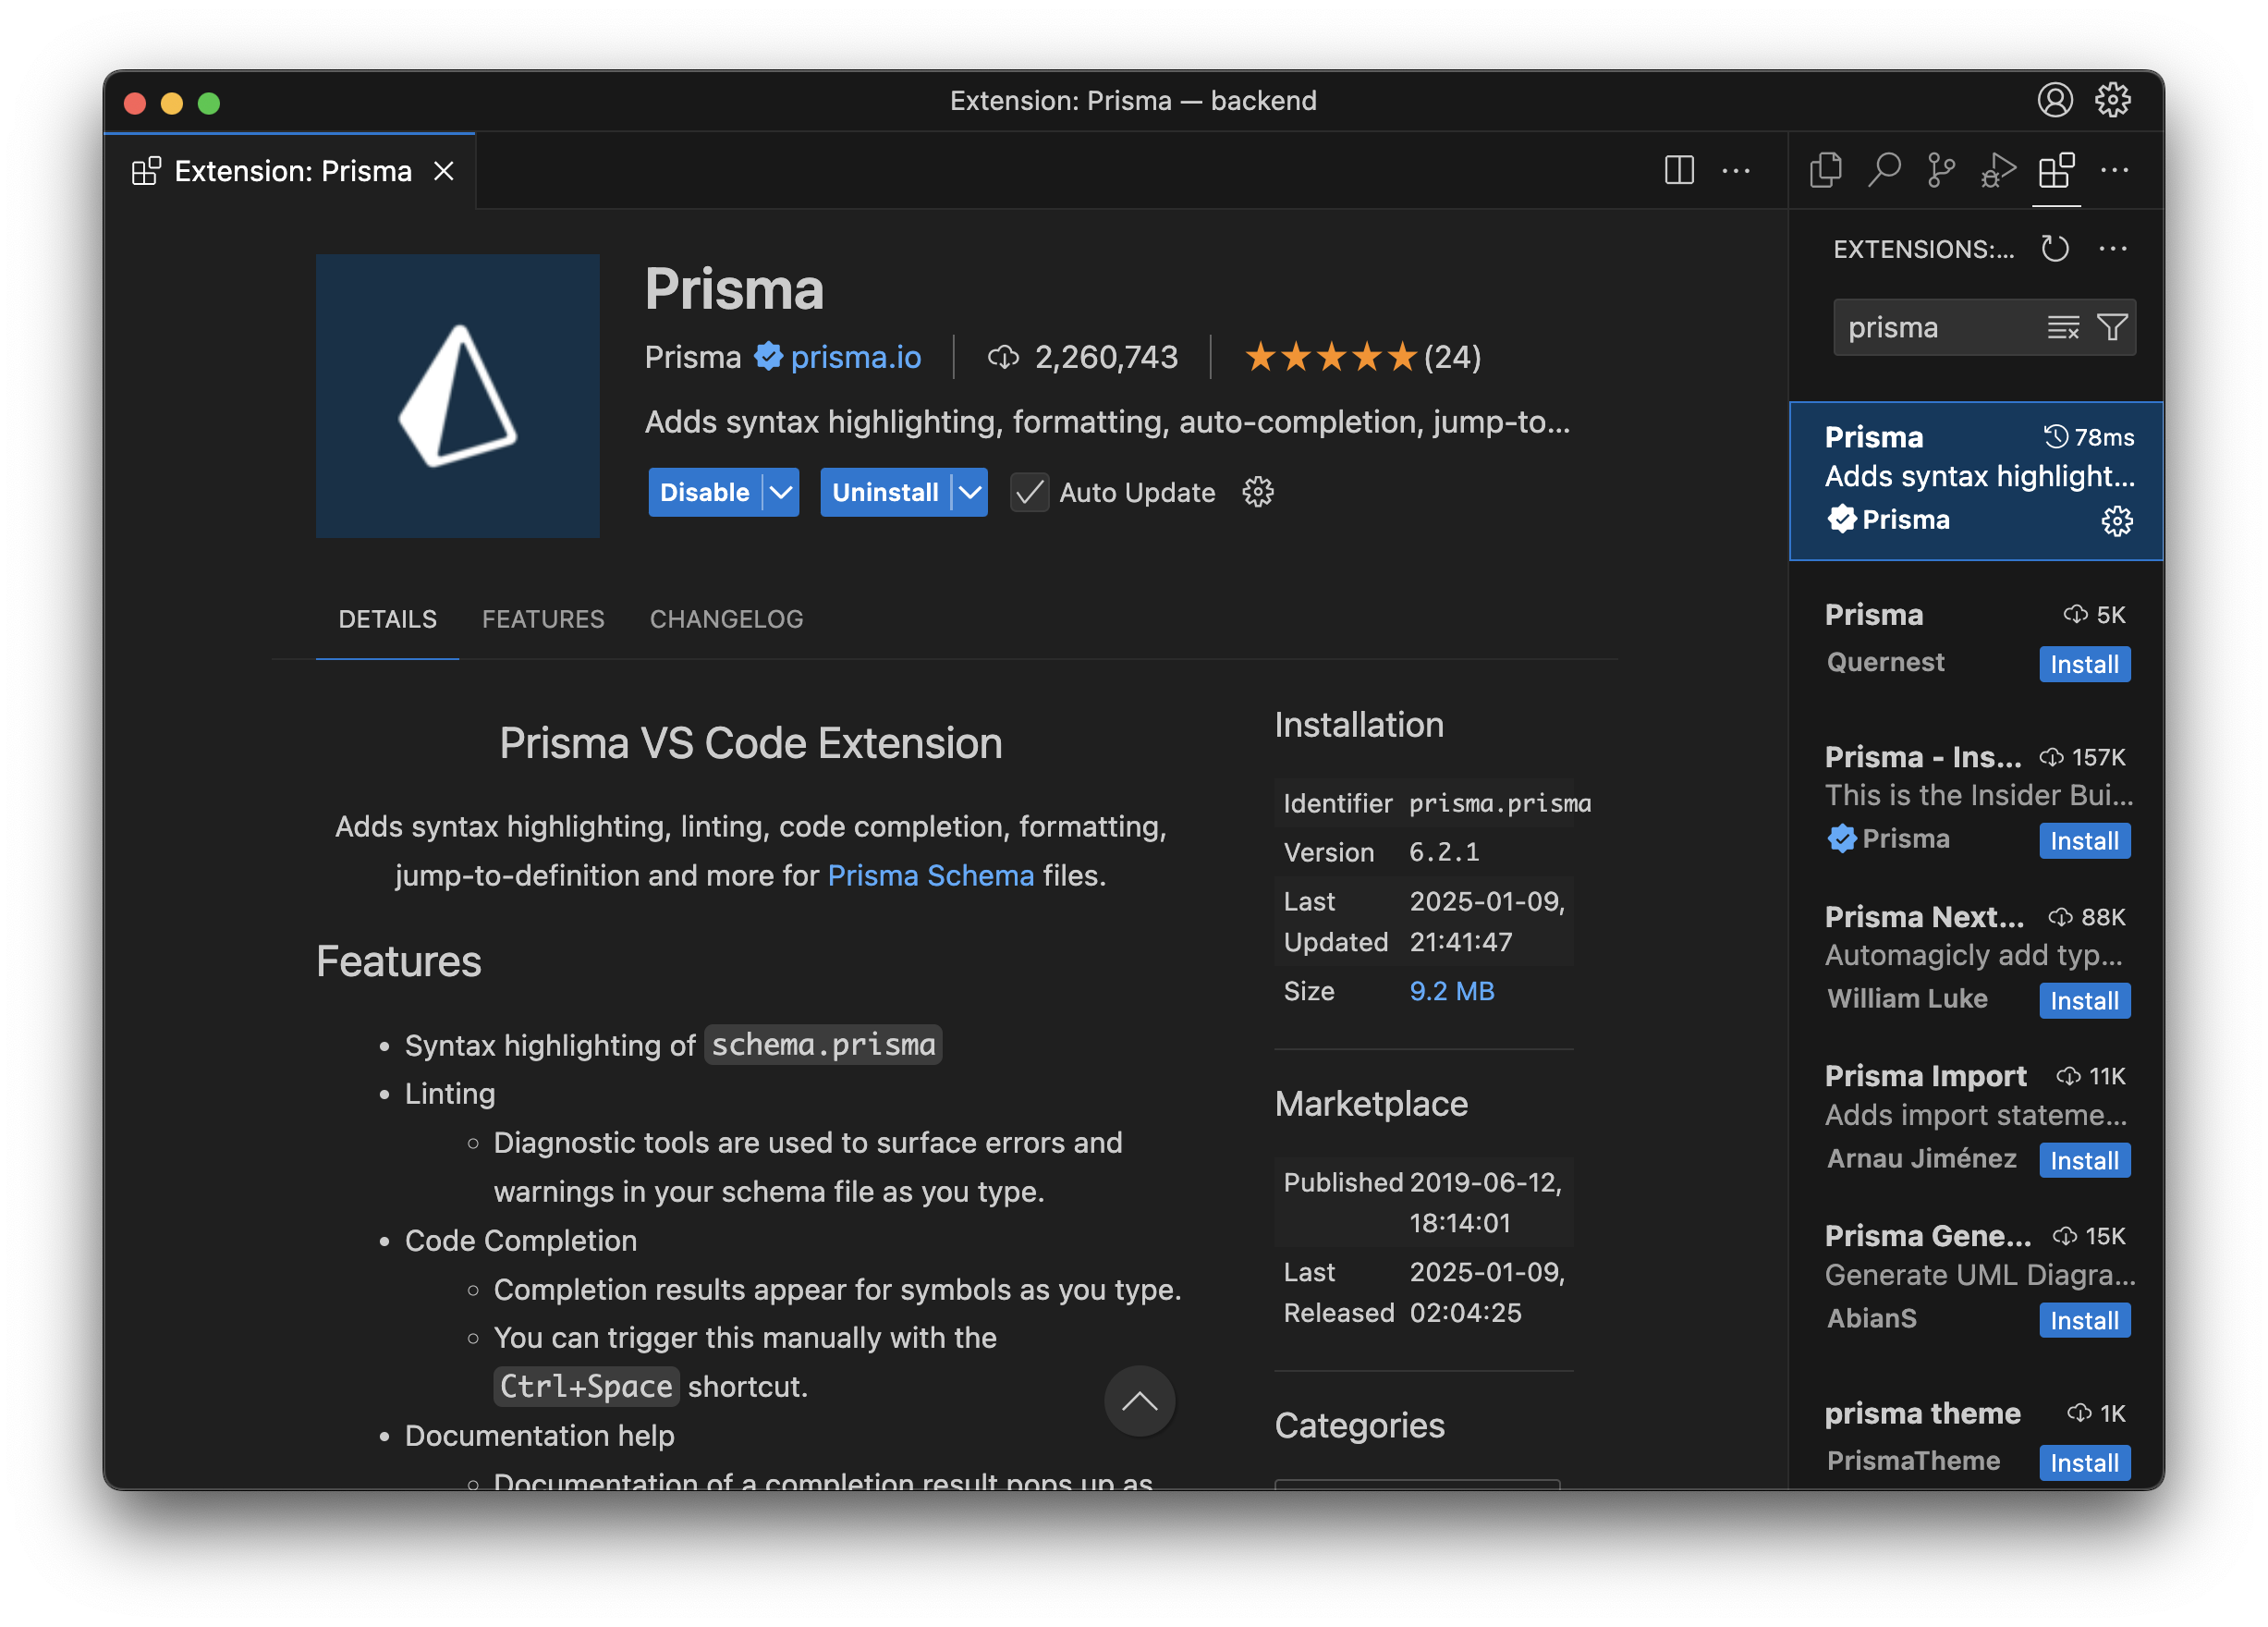 Next we define our **schema**—the structure of the database. Prisma has its own syntax; see the [Prisma docs](https://www.prisma.io/) for full reference. You should now see syntax highlighting and autocomplete!
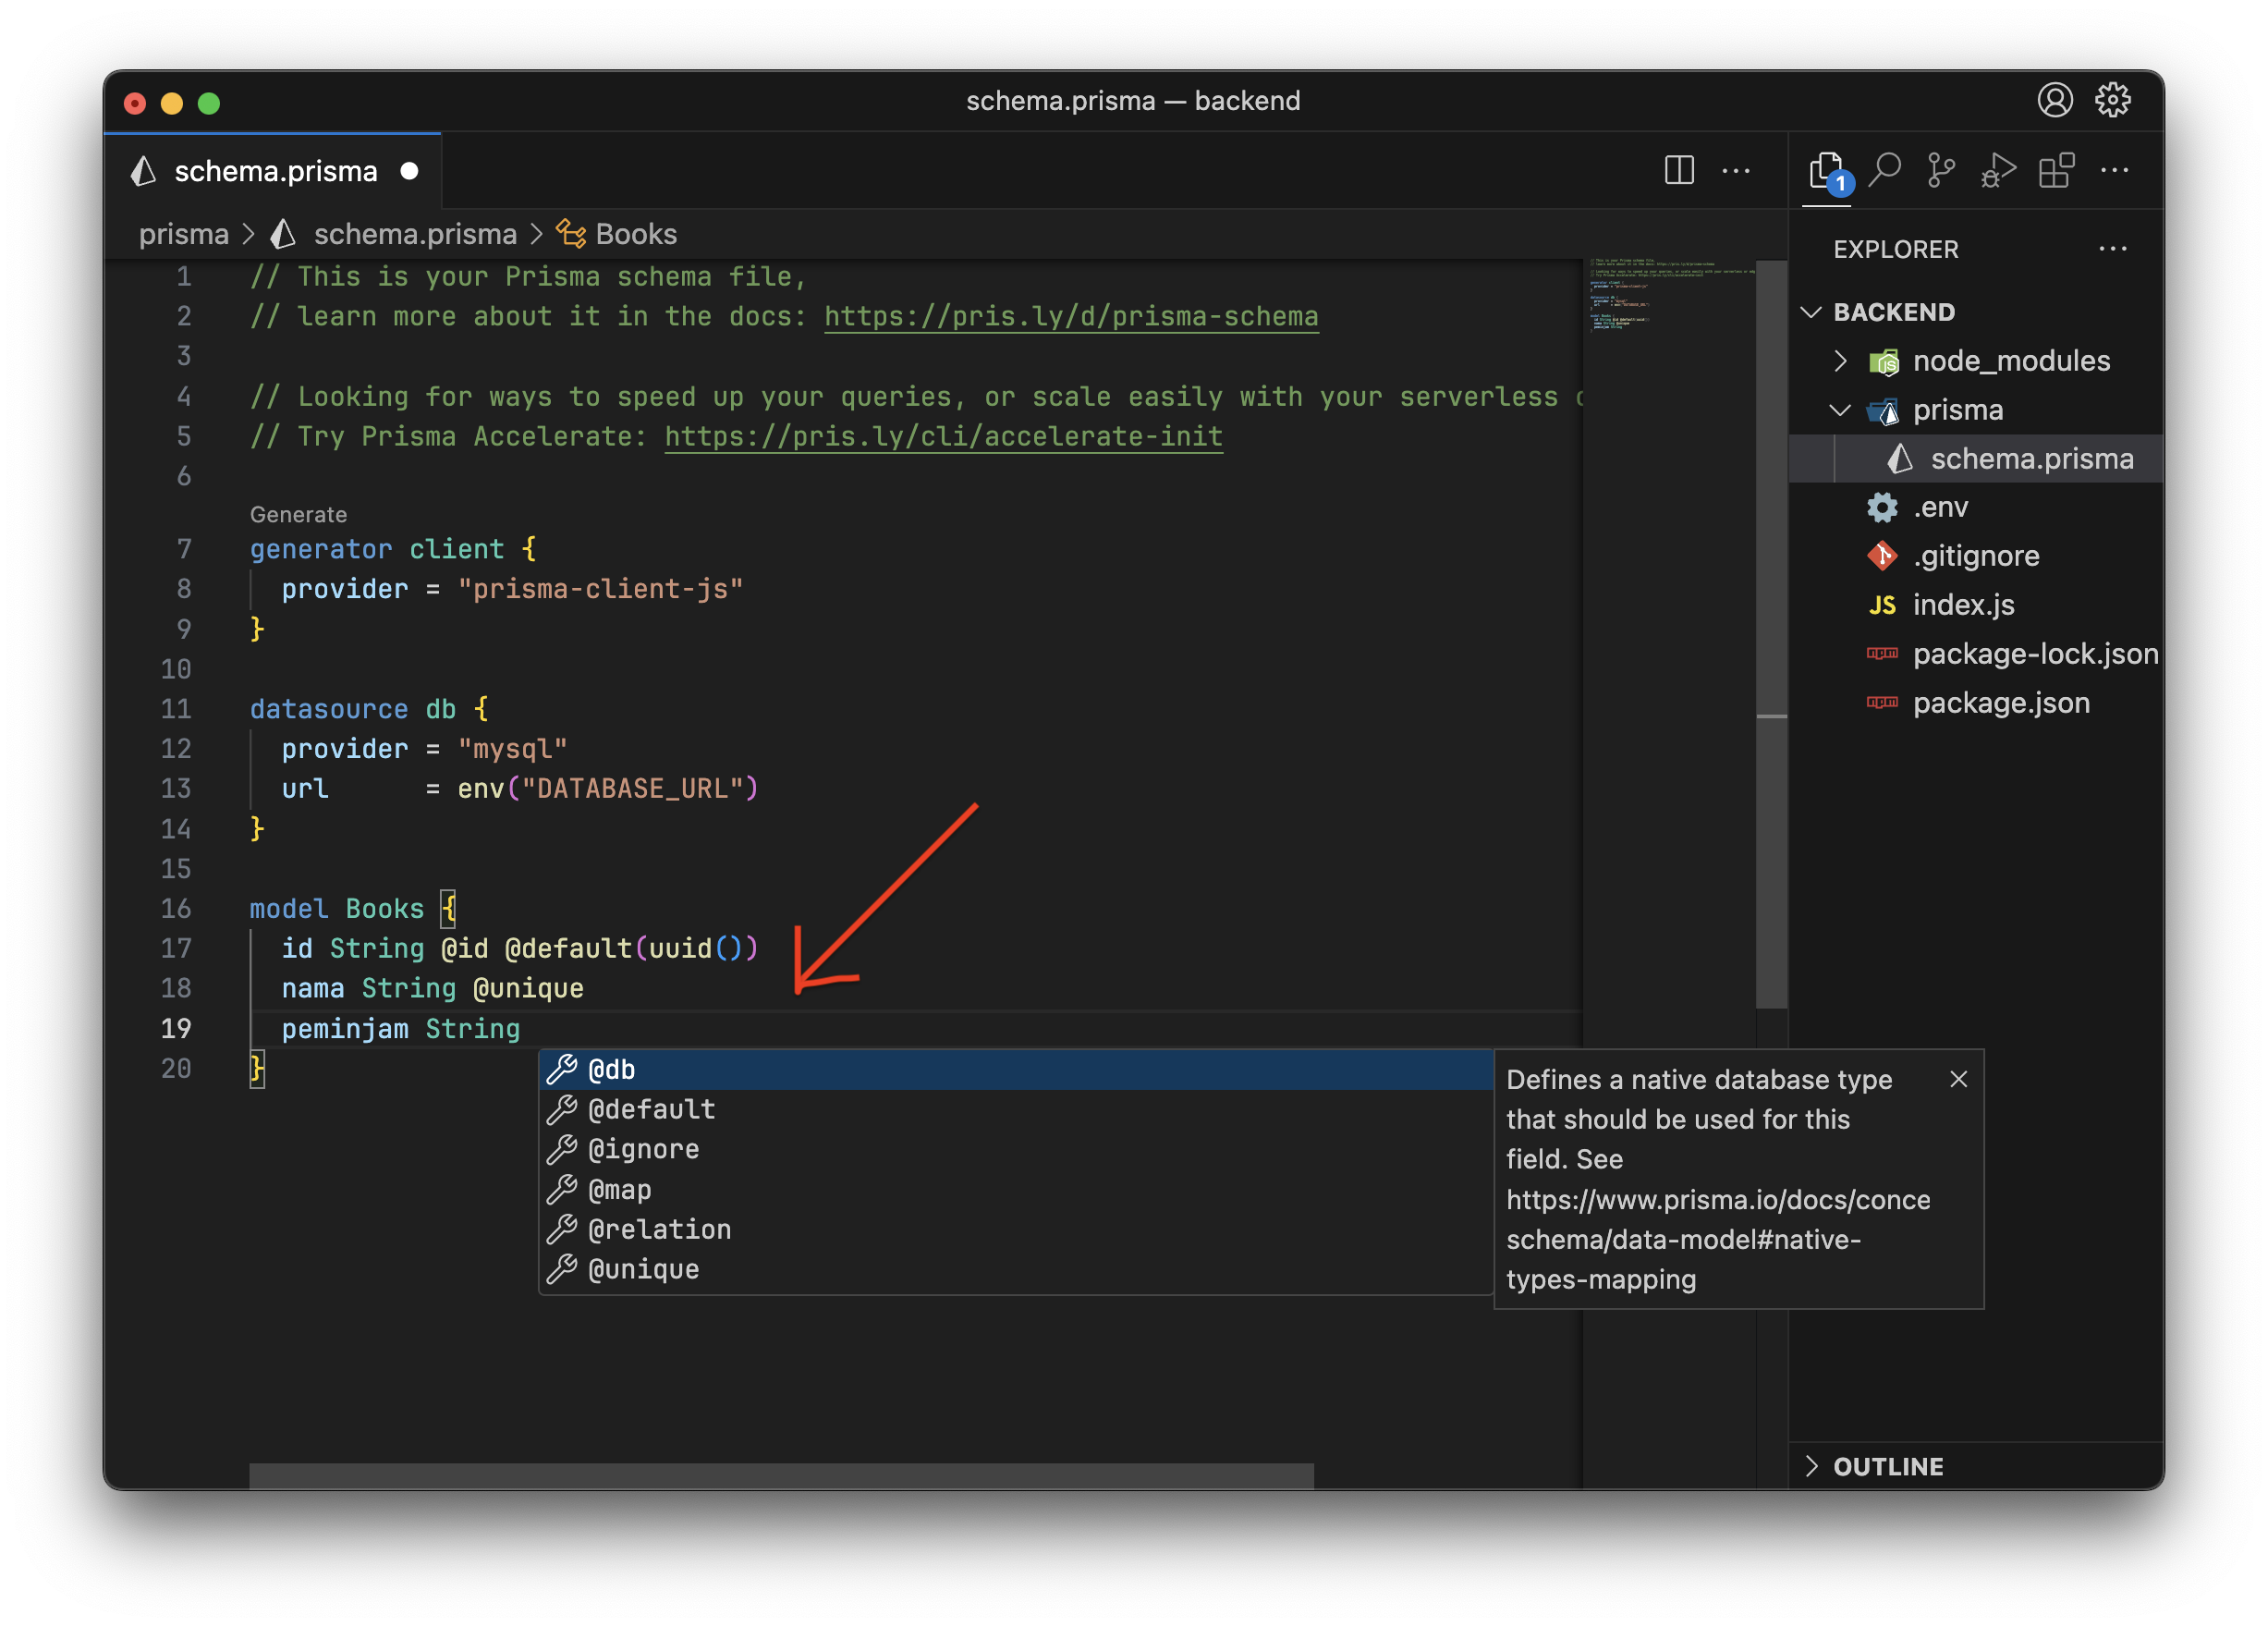 **schema.prisma**
```prisma theme={null}
generator client {
provider = "prisma-client-js"
}
datasource db {
provider = "mysql"
url = env("DATABASE_URL")
}
model Books {
id String @id @default(uuid())
nama String @unique
peminjam String
}
```
* In the `datasource db` block, set `provider` to `"mysql"` (instead of `postgresql`).
* We define a **Books** table with `id`, `nama`, and `peminjam` and their types.
* `nama` is `@unique` to avoid duplicate book names.
* `@default(uuid())` gives each row a unique random string as `id`.
Update the generated `.env` with your database URL. Below is the default when you haven't created a custom user yet. Replace `[your-db-name]` with the database name you created in phpMyAdmin.
For a custom username, password, and database you can use MySQL (or do it in phpMyAdmin). Example for creating a user and database:
```sql theme={null}
mysql -u root -p
-- Then in MySQL shell, create user and database as needed for your setup.
```
Put the connection string in `.env`:
```
APP_PORT=3000
DATABASE_URL="mysql://[username]:[password]@localhost:3306/[database name]"
```
See [Prisma connection strings](https://pris.ly/d/connection-strings) for details.
Install the Prisma client so we can talk to the database from our JavaScript code:
```bash theme={null}
npm i @prisma/client
```
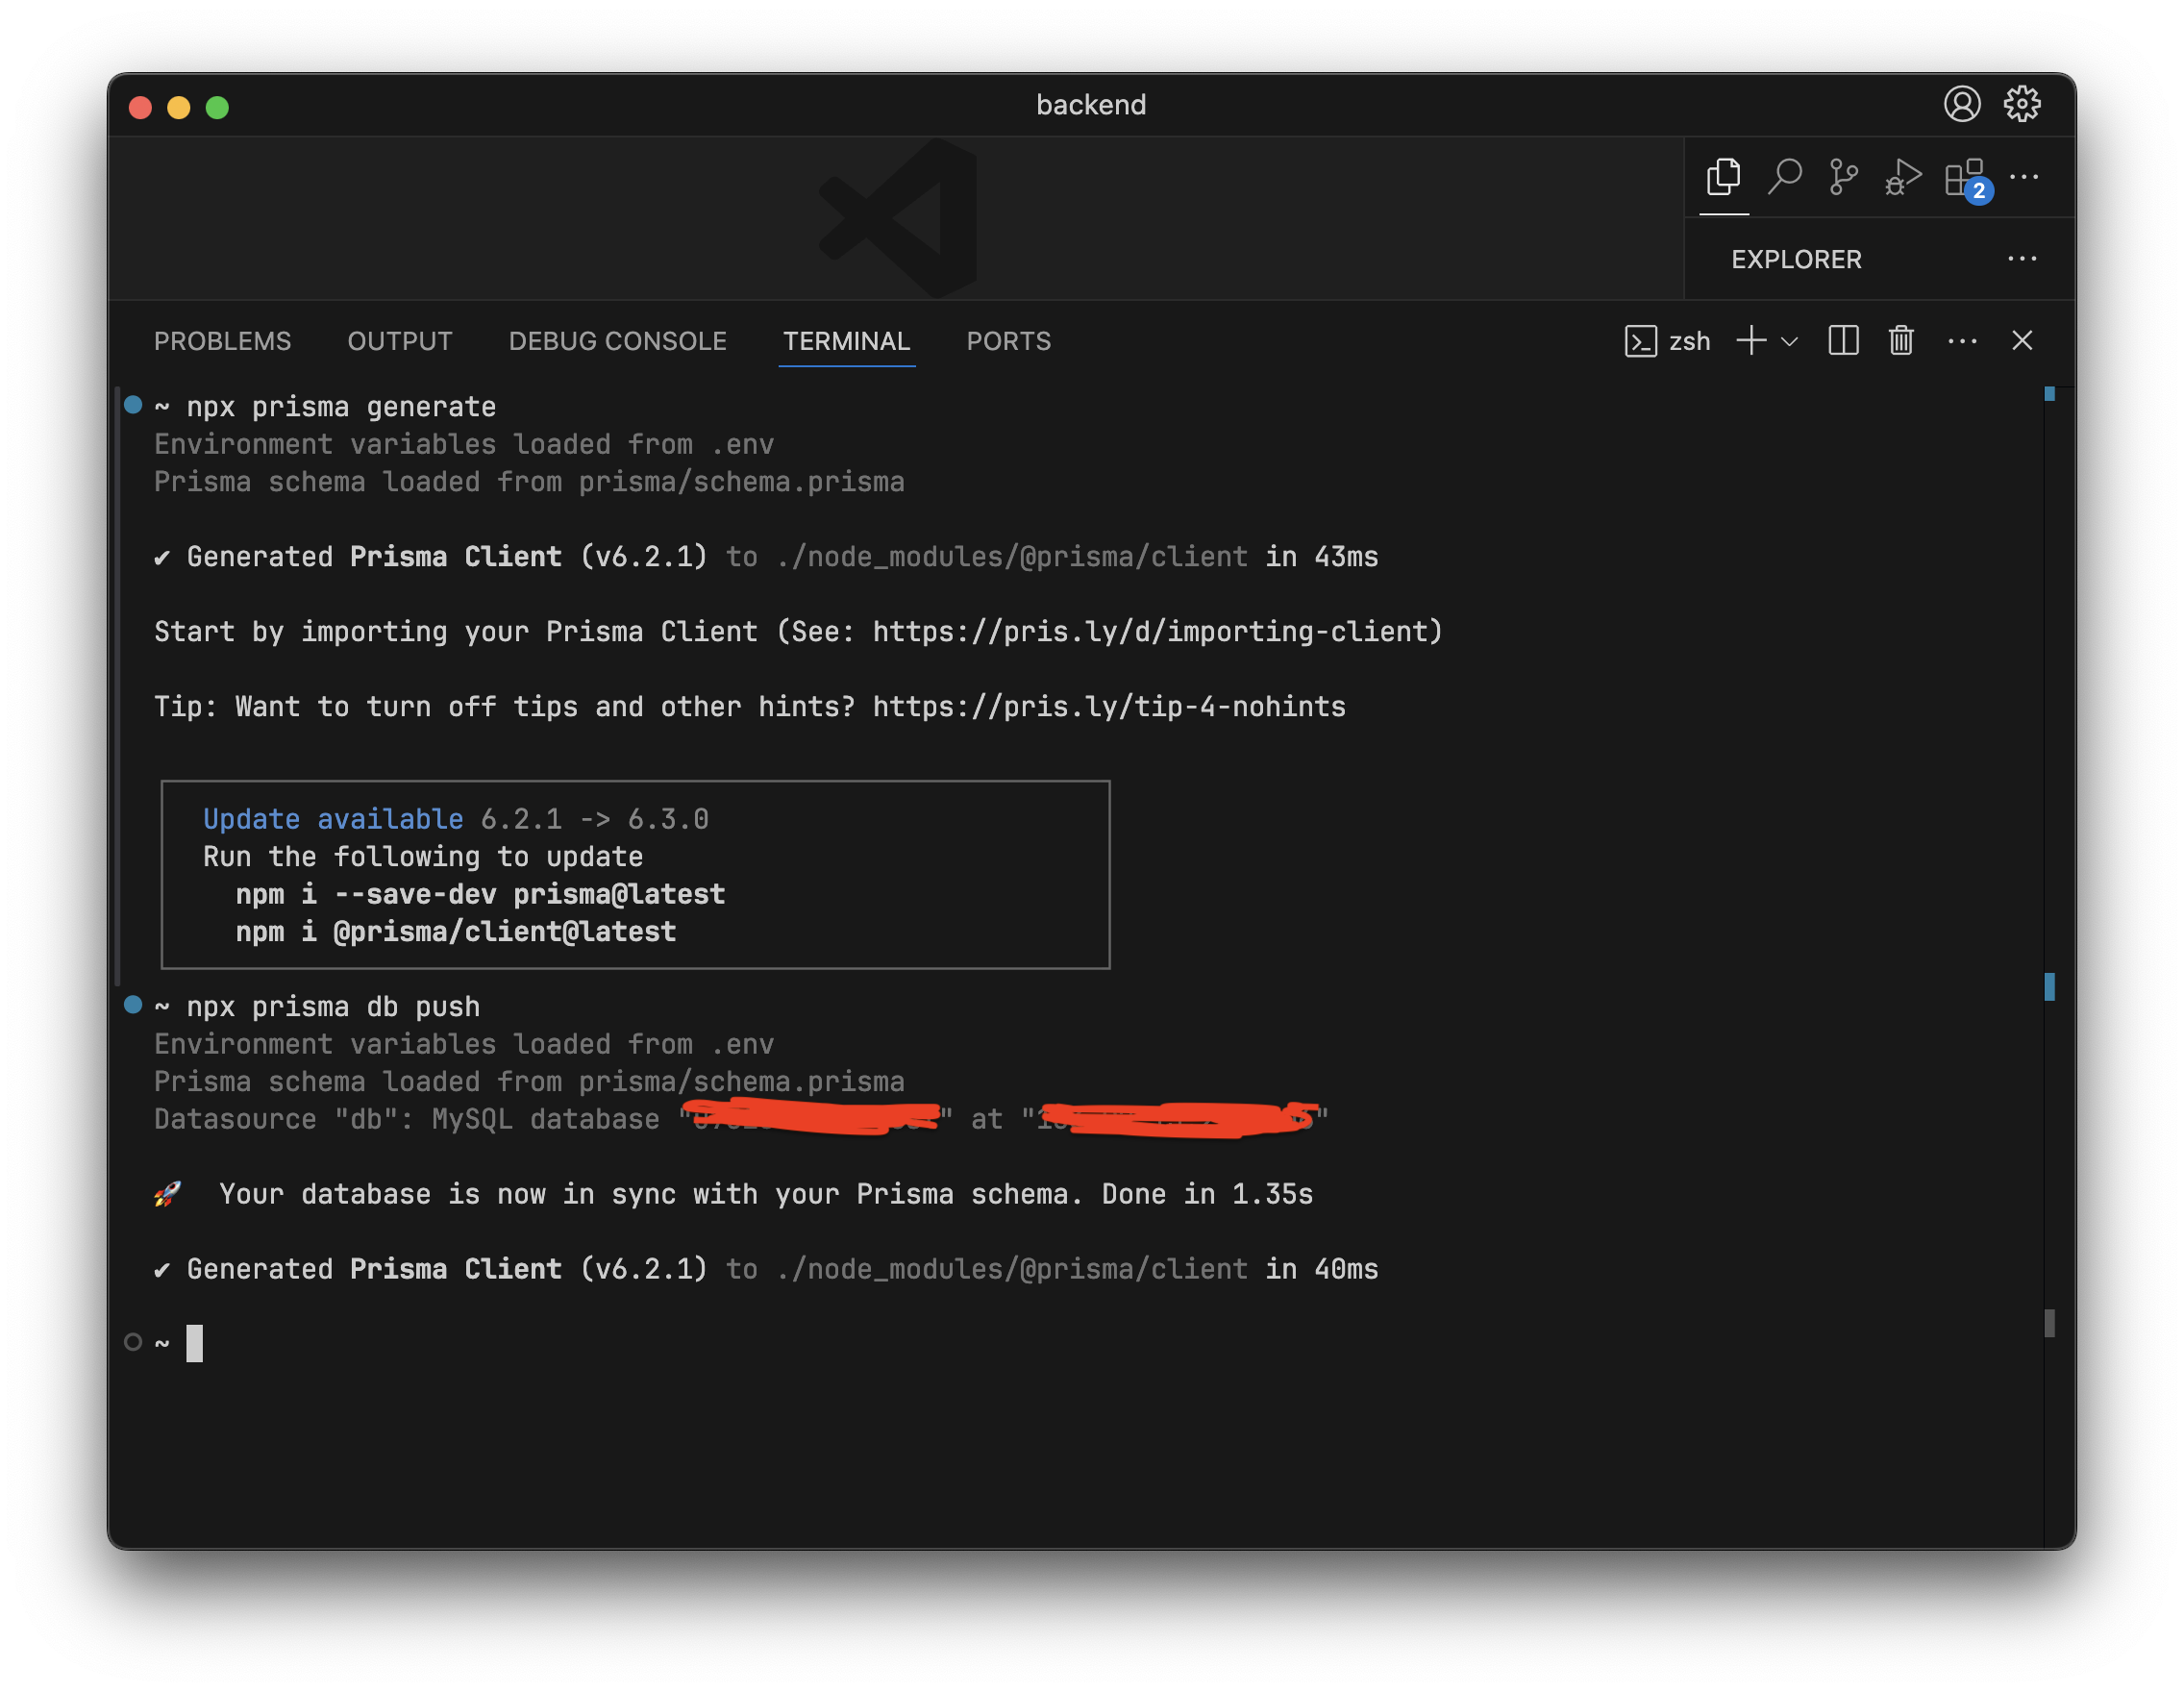
Now we apply the schema to the database and generate the client:
```bash theme={null}
npx prisma db push # migrate schema from schema.prisma to the database
npx prisma generate # generate Prisma Client (autocomplete, types)
```
**schema.prisma**
```prisma theme={null}
generator client {
provider = "prisma-client-js"
}
datasource db {
provider = "mysql"
url = env("DATABASE_URL")
}
model Books {
id String @id @default(uuid())
nama String @unique
peminjam String
}
```
* In the `datasource db` block, set `provider` to `"mysql"` (instead of `postgresql`).
* We define a **Books** table with `id`, `nama`, and `peminjam` and their types.
* `nama` is `@unique` to avoid duplicate book names.
* `@default(uuid())` gives each row a unique random string as `id`.
Update the generated `.env` with your database URL. Below is the default when you haven't created a custom user yet. Replace `[your-db-name]` with the database name you created in phpMyAdmin.
For a custom username, password, and database you can use MySQL (or do it in phpMyAdmin). Example for creating a user and database:
```sql theme={null}
mysql -u root -p
-- Then in MySQL shell, create user and database as needed for your setup.
```
Put the connection string in `.env`:
```
APP_PORT=3000
DATABASE_URL="mysql://[username]:[password]@localhost:3306/[database name]"
```
See [Prisma connection strings](https://pris.ly/d/connection-strings) for details.
Install the Prisma client so we can talk to the database from our JavaScript code:
```bash theme={null}
npm i @prisma/client
```
Now we apply the schema to the database and generate the client:
```bash theme={null}
npx prisma db push # migrate schema from schema.prisma to the database
npx prisma generate # generate Prisma Client (autocomplete, types)
```
 ## Let's build the API
APIs often expose **CRUD** (Create, Read, Update, Delete) via different routes. For example:
## Let's build the API
APIs often expose **CRUD** (Create, Read, Update, Delete) via different routes. For example:
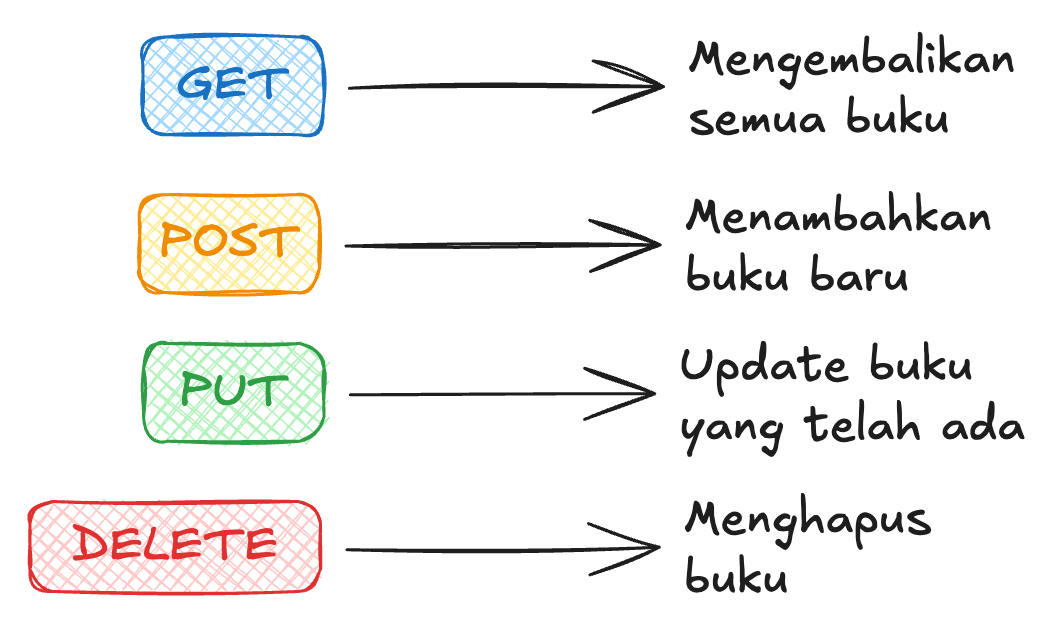 * **GET** `http://localhost:3000/books` — list all books
* **POST** `http://localhost:3000/books` — add a book
* **PUT** `http://localhost:3000/books/123` — update the book with id `123` (the id changes per book)
* **DELETE** `http://localhost:3000/books/123` — delete the book with id `123`
### Testing the API
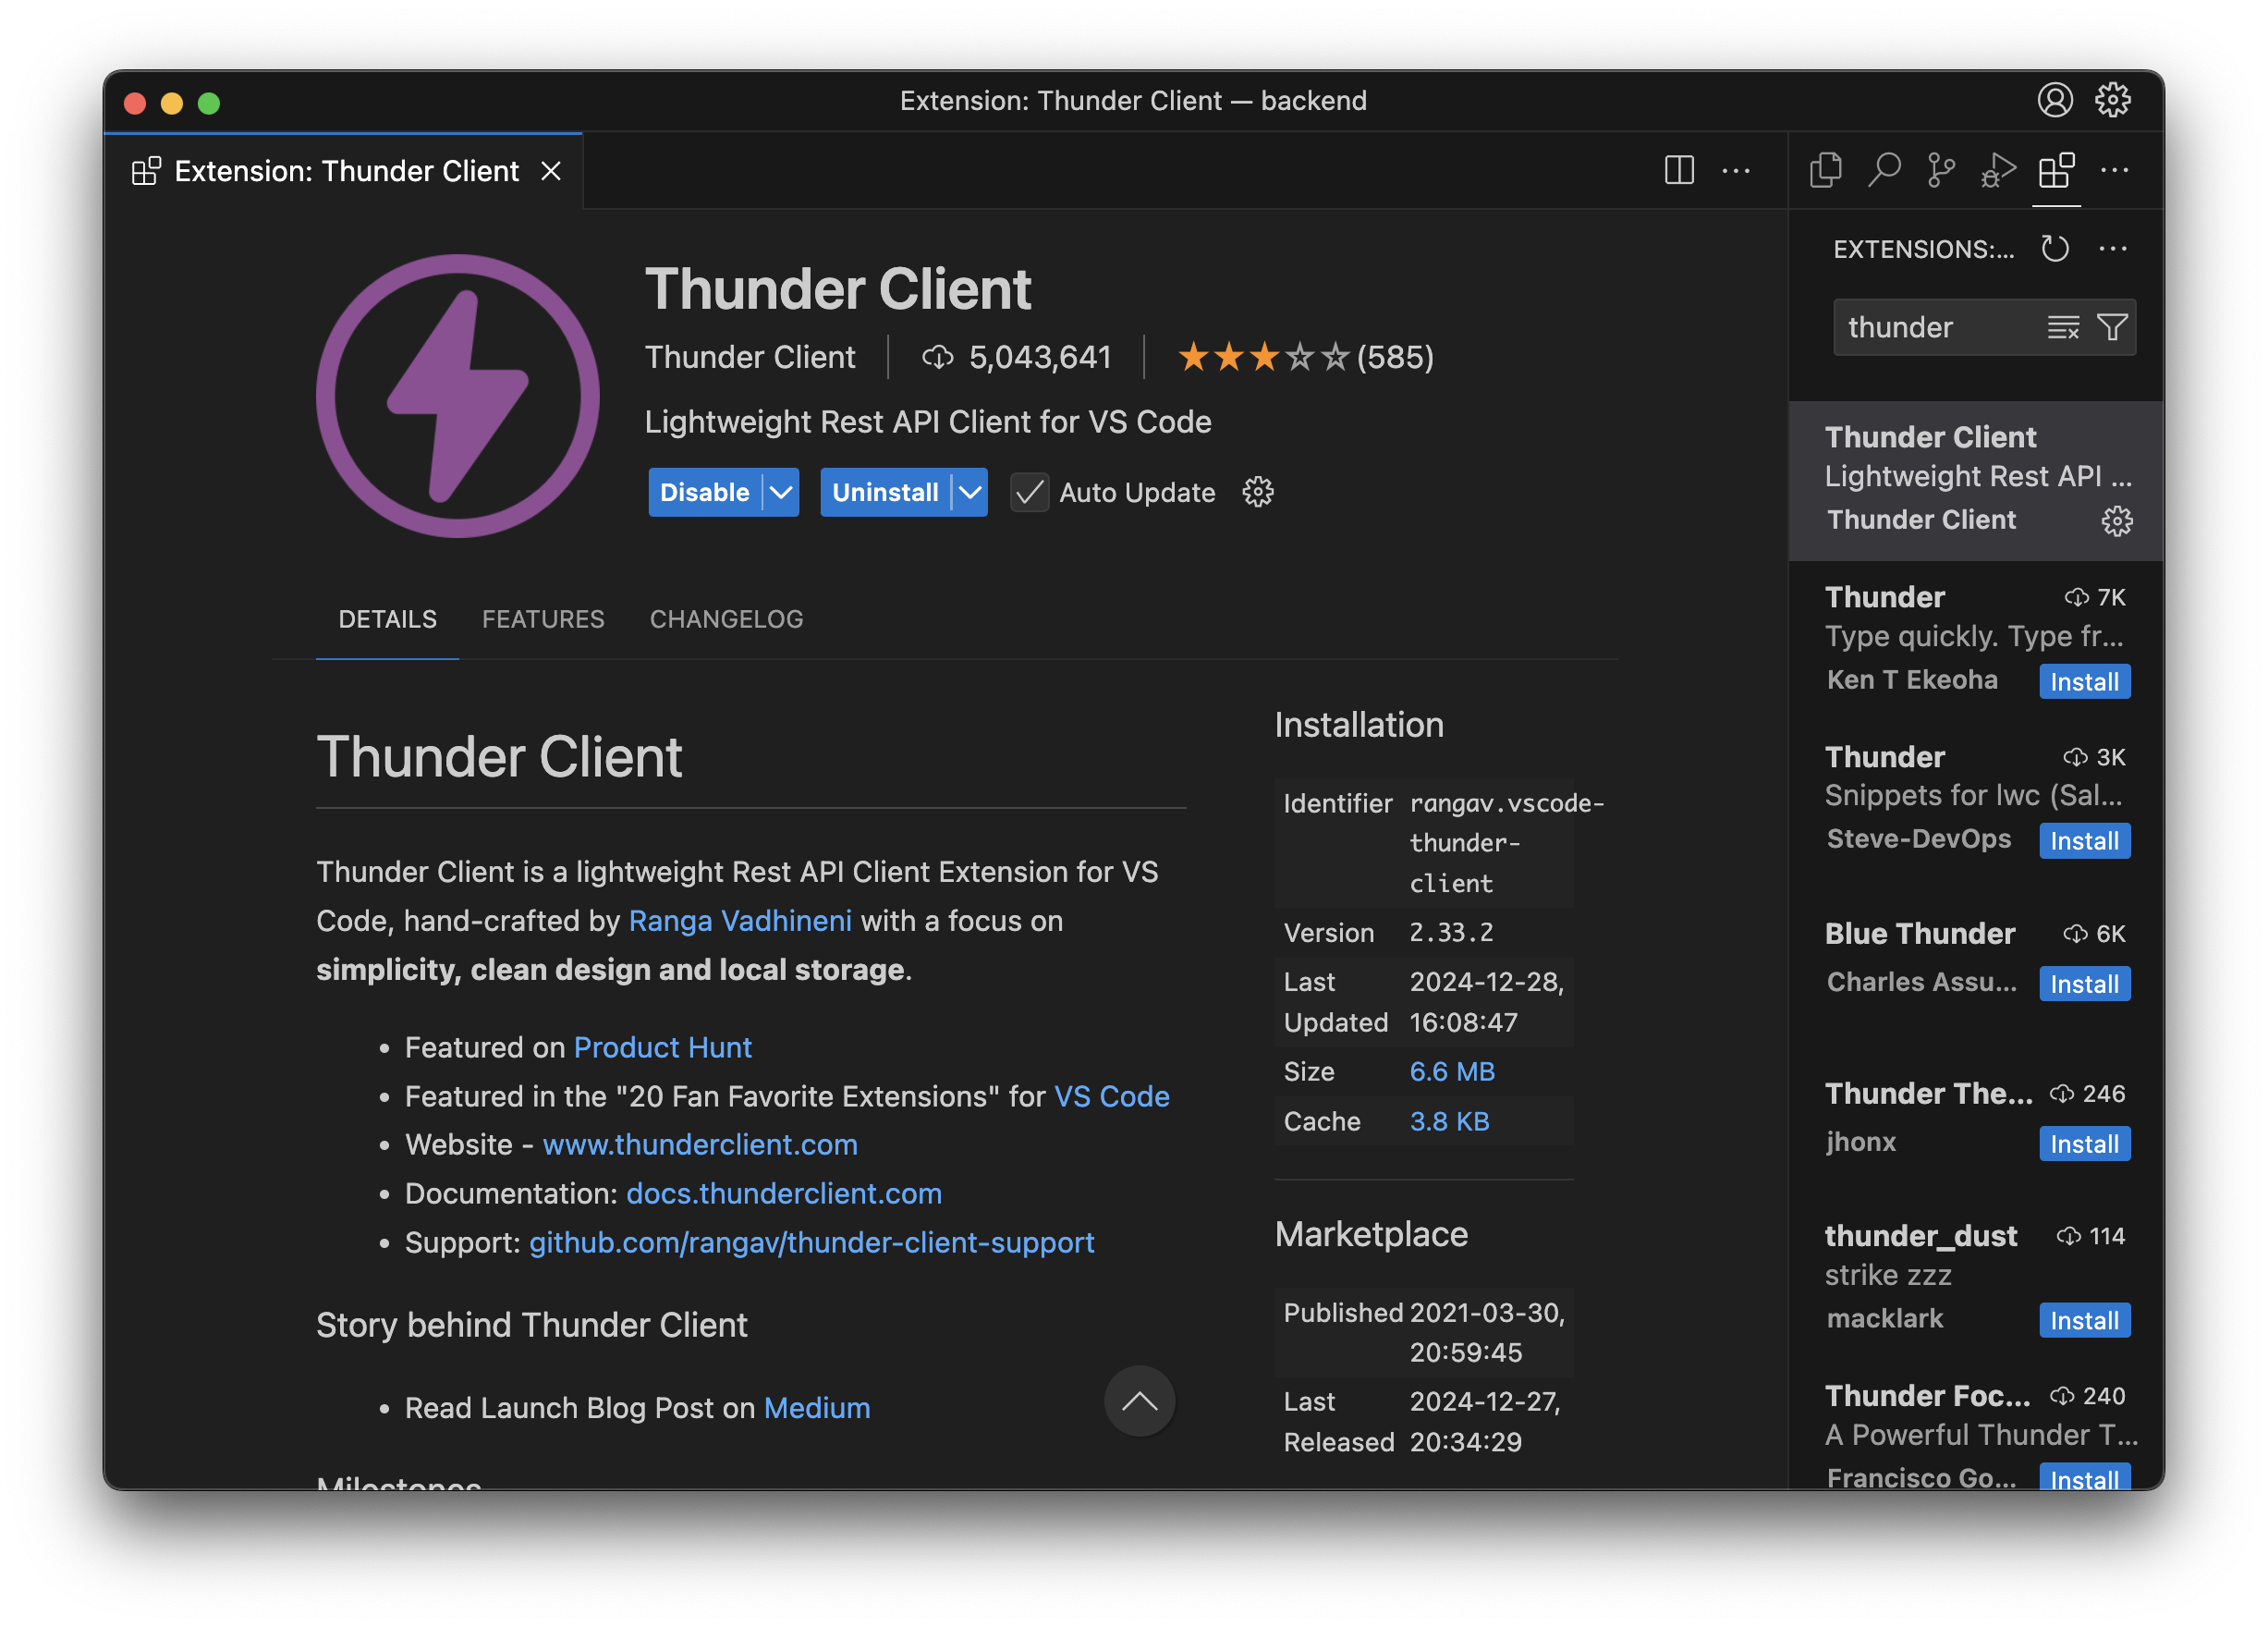
Use a lightweight VS Code extension like **Thunder Client** to test your API.
* **GET** `http://localhost:3000/books` — list all books
* **POST** `http://localhost:3000/books` — add a book
* **PUT** `http://localhost:3000/books/123` — update the book with id `123` (the id changes per book)
* **DELETE** `http://localhost:3000/books/123` — delete the book with id `123`
### Testing the API
Use a lightweight VS Code extension like **Thunder Client** to test your API.
 ### GET `/books`
We'll keep everything in `index.js`.
```javascript theme={null}
const { PrismaClient } = require('@prisma/client');
const db = new PrismaClient();
app.get('/books', async (req, res) => {
const data = await db.books.findMany();
res.json(data);
});
```
For the latest Prisma version, you may need to import from the generated client:
```javascript theme={null}
const { PrismaClient } = require('./generated/prisma');
```
After running `npx prisma generate`, you get autocomplete when using `@prisma/client`, matching the schema you defined.
### GET `/books`
We'll keep everything in `index.js`.
```javascript theme={null}
const { PrismaClient } = require('@prisma/client');
const db = new PrismaClient();
app.get('/books', async (req, res) => {
const data = await db.books.findMany();
res.json(data);
});
```
For the latest Prisma version, you may need to import from the generated client:
```javascript theme={null}
const { PrismaClient } = require('./generated/prisma');
```
After running `npx prisma generate`, you get autocomplete when using `@prisma/client`, matching the schema you defined.
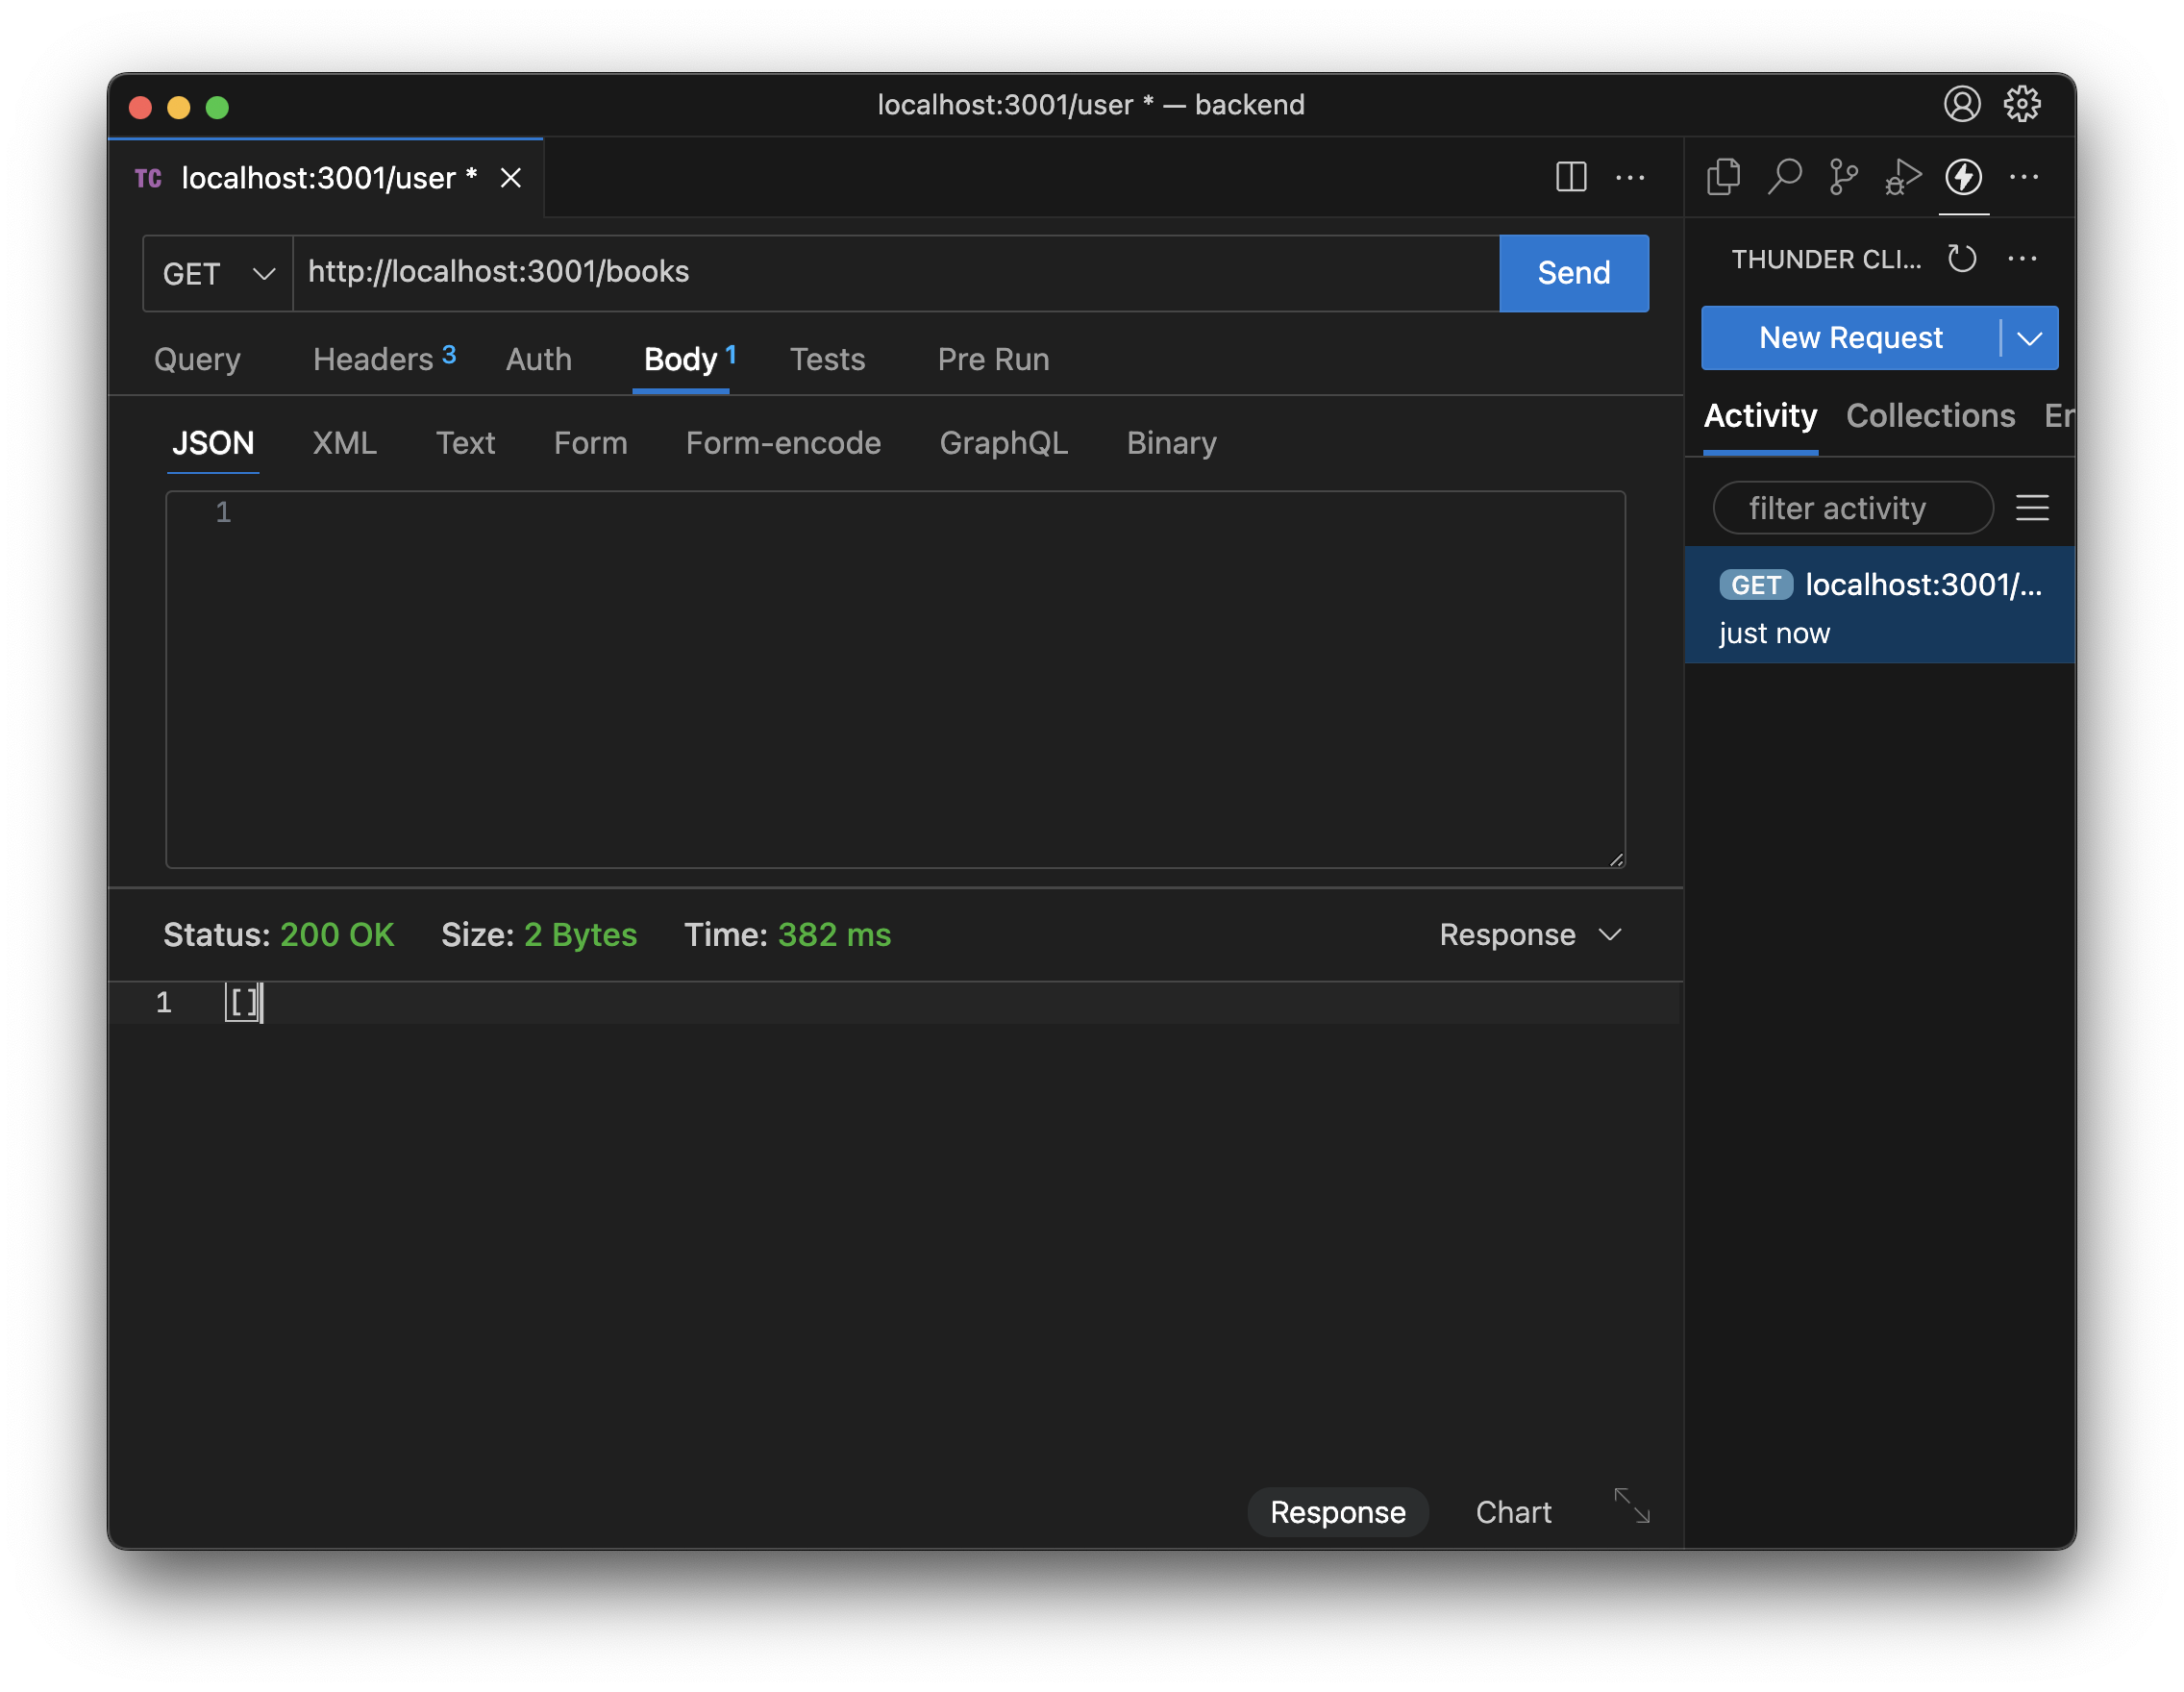
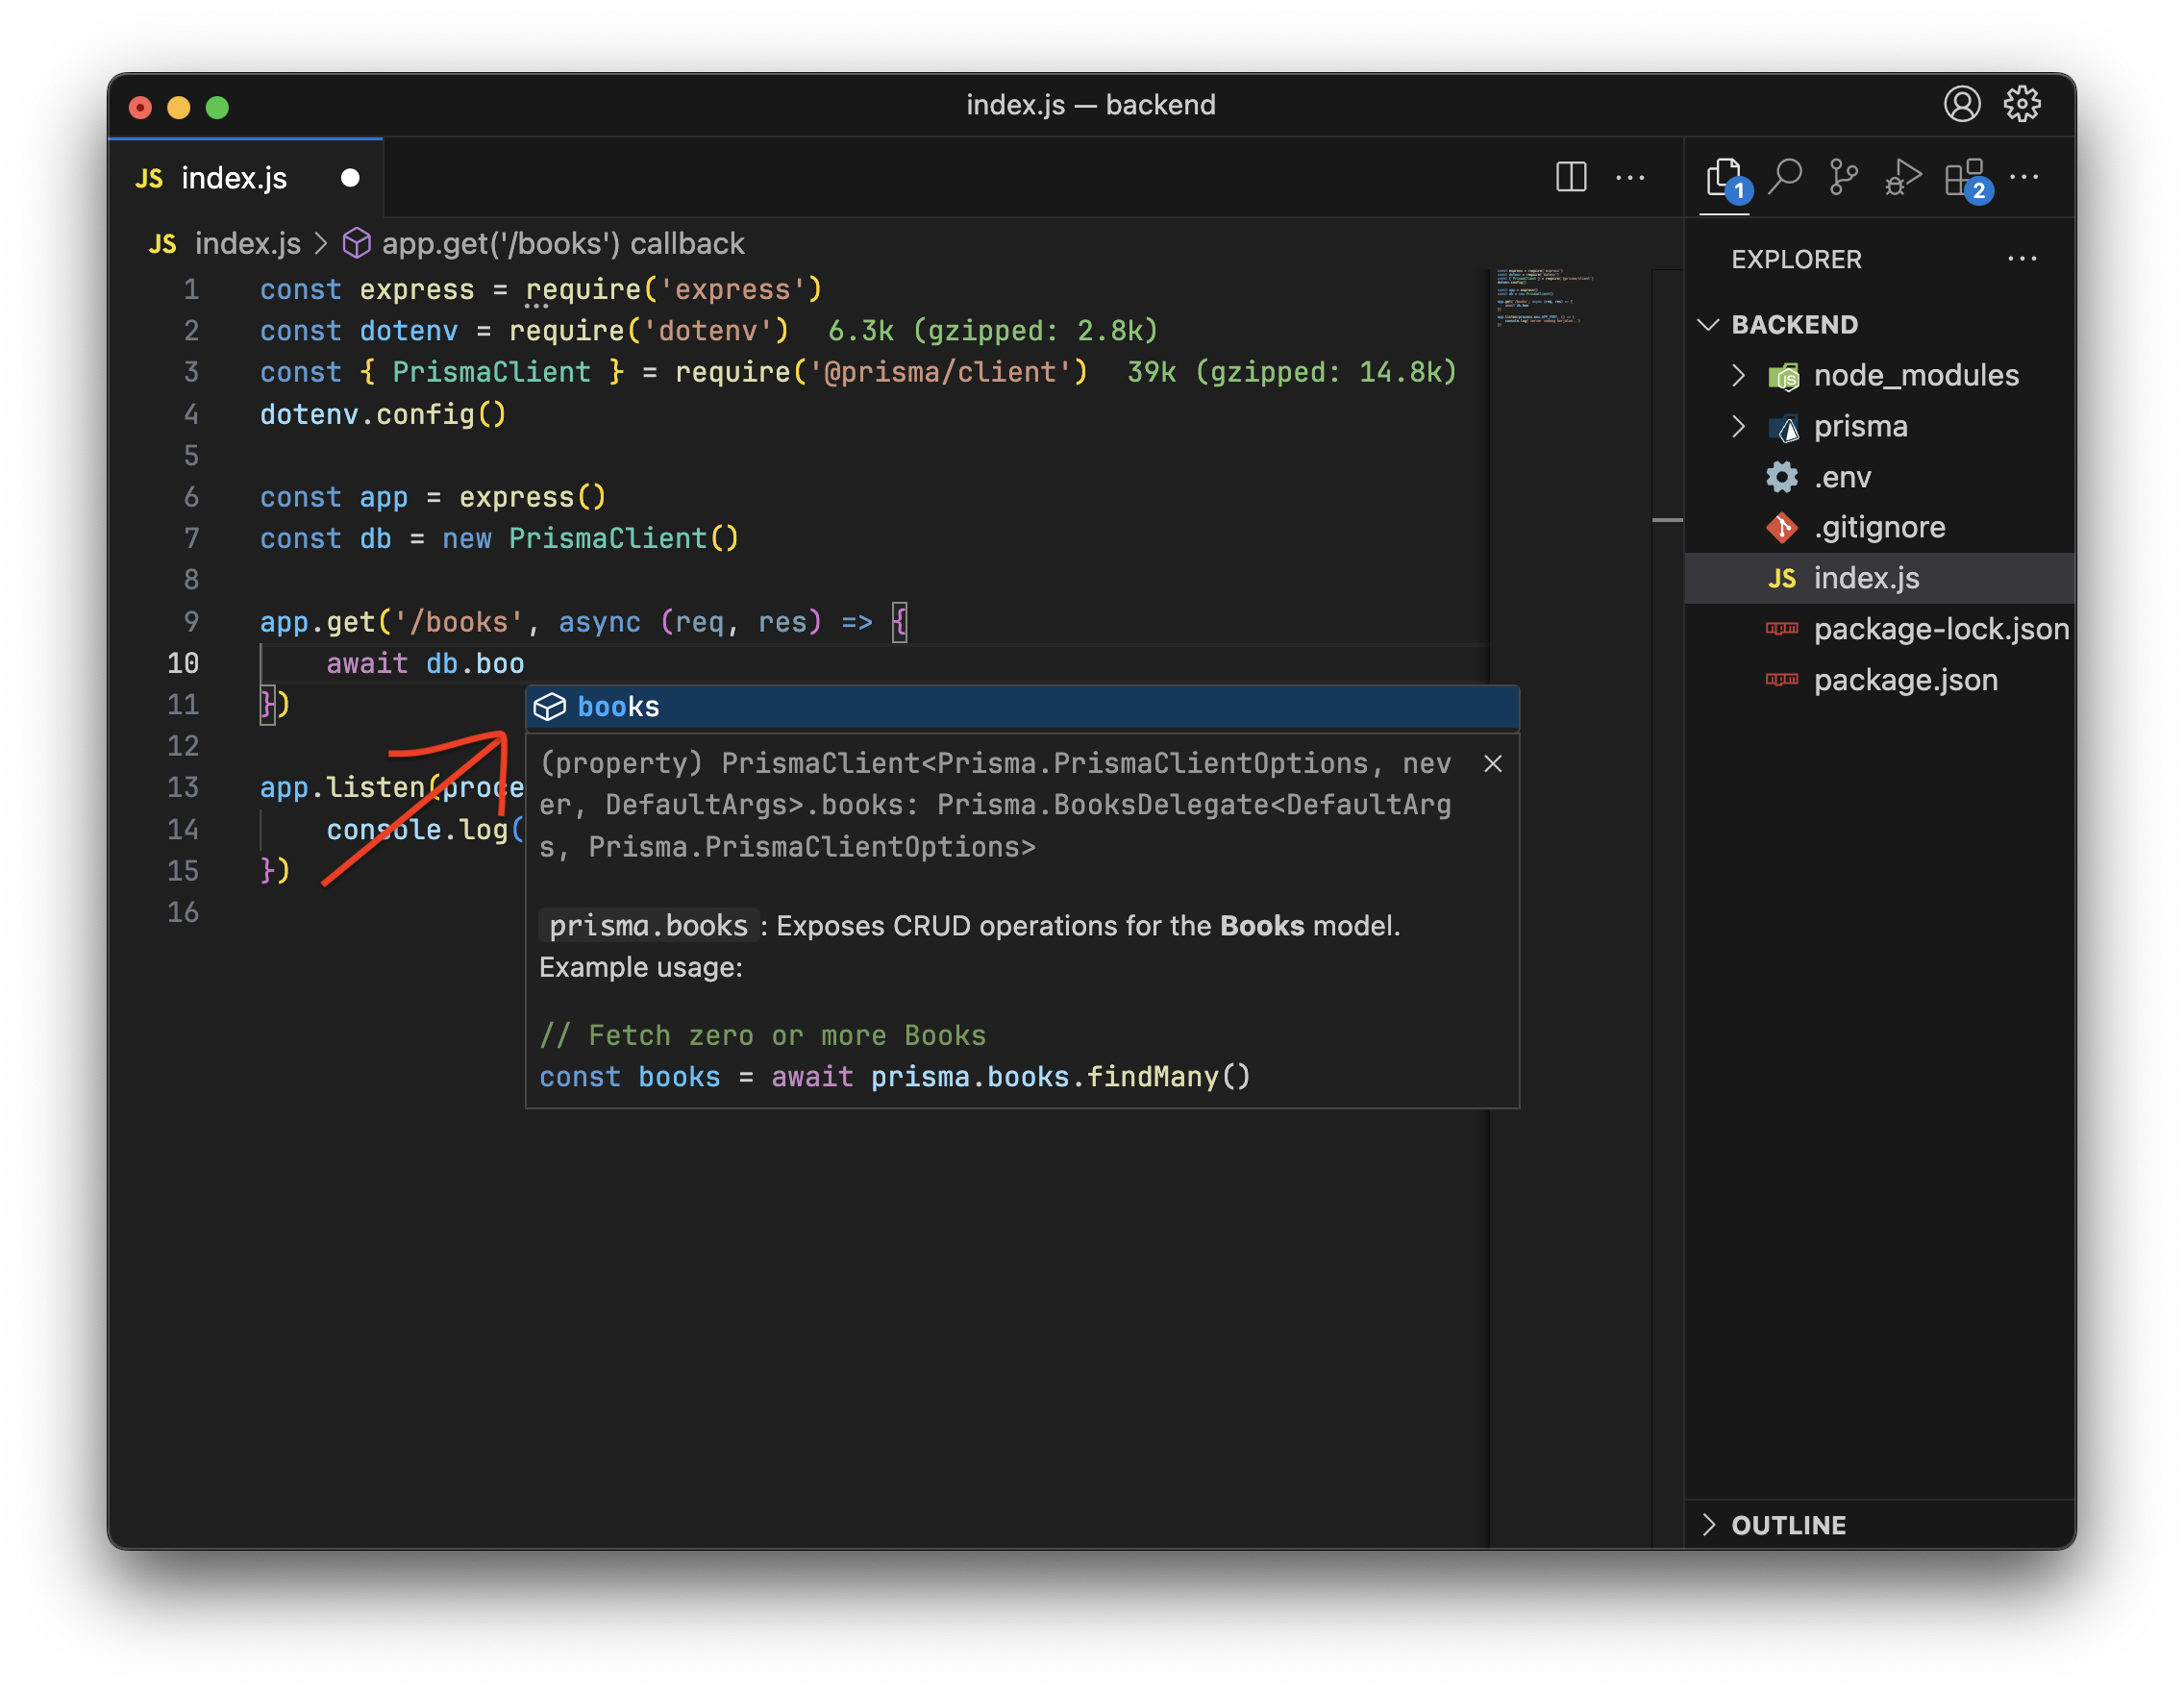 Open **Thunder Client**, send a GET request to `http://localhost:3000/books`, and click **Send**. The response is `[]` because no books have been added yet.
 ### POST `/books`
Here we use the **req** (request) object to read JSON from the request body.
Add this so Express can parse JSON:
```javascript theme={null}
app.use(express.json());
```
Then:
```javascript theme={null}
app.post('/books', async (req, res) => {
const { nama, peminjam } = req.body;
await db.books.create({
data: { nama, peminjam },
});
res.json({ message: 'Book added successfully!' });
});
```
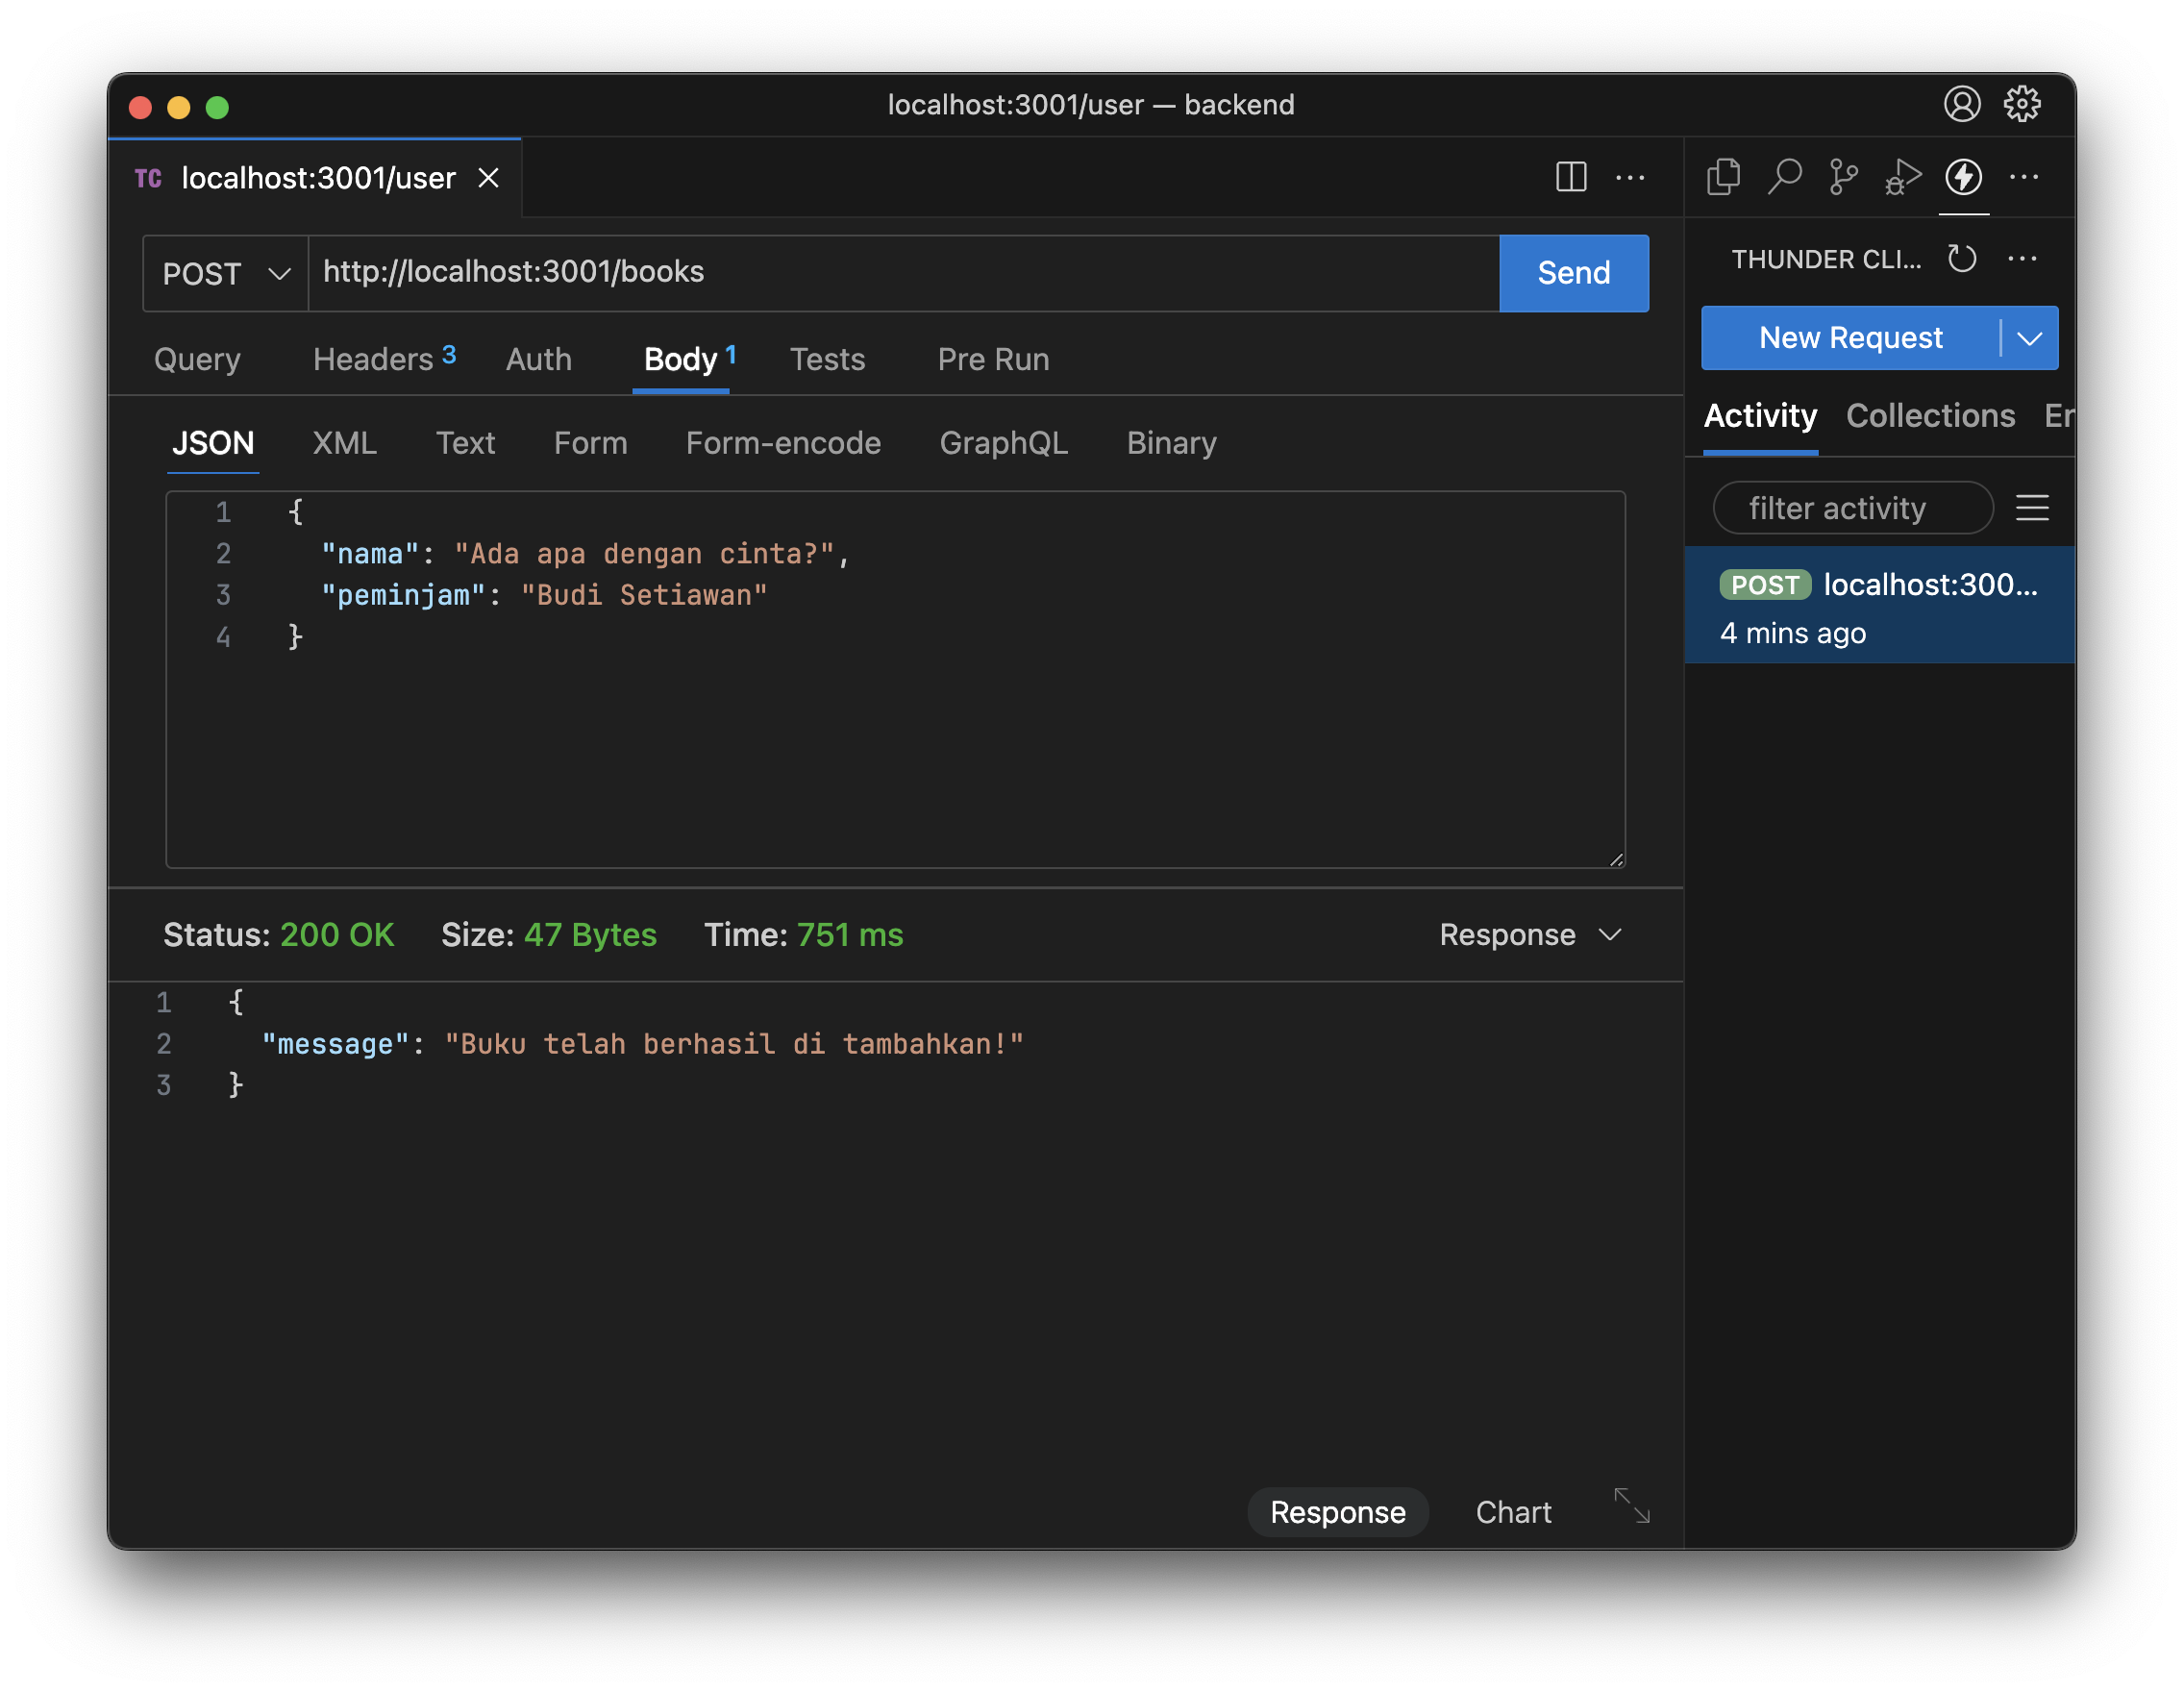
In Thunder Client, switch the method to **POST**, add a JSON body (e.g. `{"nama": "Book Title", "peminjam": "John"}`), and click **Send**. You should see the success message.
### POST `/books`
Here we use the **req** (request) object to read JSON from the request body.
Add this so Express can parse JSON:
```javascript theme={null}
app.use(express.json());
```
Then:
```javascript theme={null}
app.post('/books', async (req, res) => {
const { nama, peminjam } = req.body;
await db.books.create({
data: { nama, peminjam },
});
res.json({ message: 'Book added successfully!' });
});
```
In Thunder Client, switch the method to **POST**, add a JSON body (e.g. `{"nama": "Book Title", "peminjam": "John"}`), and click **Send**. You should see the success message.
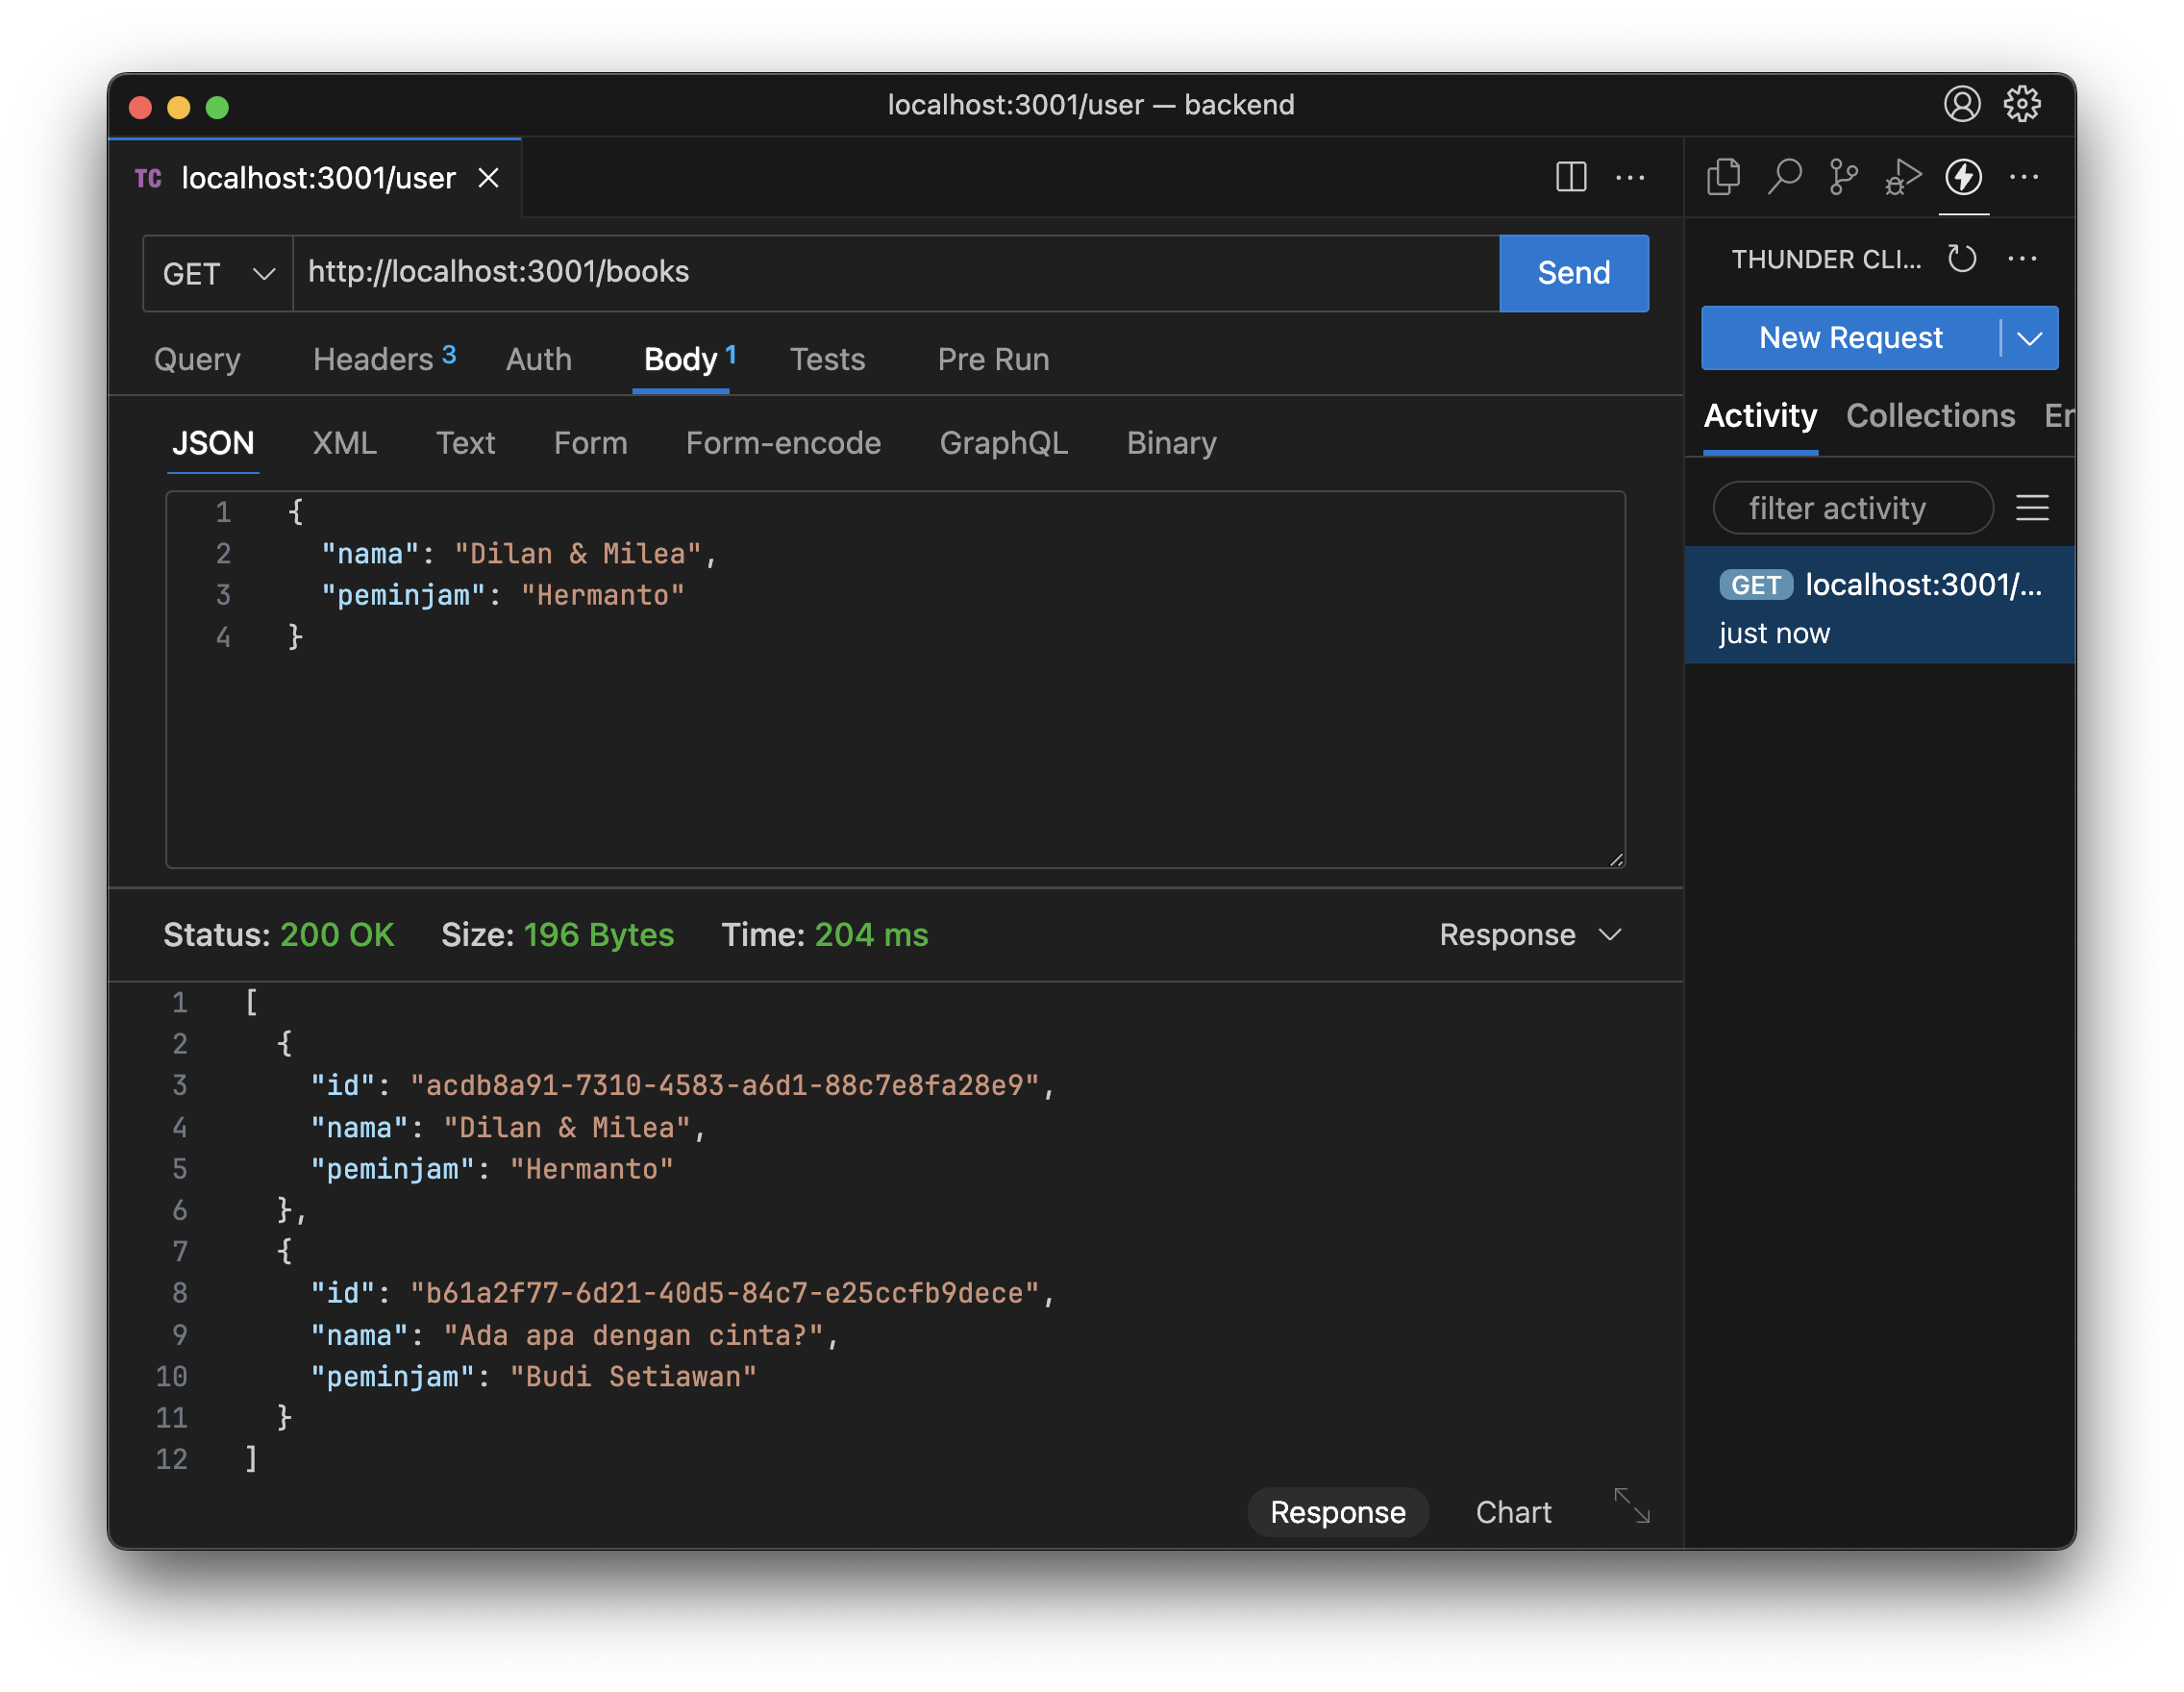
 Send a **GET** to `/books` again—you'll see the books you added, with `id` values generated by `uuid()` from the schema.
 ### PUT `/books/:id`
The route uses `/books/:id` so `id` is a **dynamic** segment (it changes per request). Read it with **req.params**:
```javascript theme={null}
const { id } = req.params;
```
In the database query we use **where** so only the book with that `id` is updated:
```javascript theme={null}
app.put('/books/:id', async (req, res) => {
const { id } = req.params;
const { nama, peminjam } = req.body;
await db.books.update({
where: { id },
data: { nama, peminjam },
});
res.json({ message: 'Book updated successfully' });
});
```
### DELETE `/books/:id`
Same idea as PUT: use `req.params.id` and call `db.books.delete()` instead of `update`. Try implementing it yourself.
### Cool-down
Does your API fully implement CRUD? Do all book routes work, including **Delete**? In the next project we'll add **try/catch** for error handling and a route to get a single book by id.
***
# Refinement
Welcome to the final project! Your task is to refine the library API we built by completing the steps below.
> Before uploading your project, delete the **node\_modules** folder.
* **#1** Add a **DELETE** route to remove a book by id.
* **#2** Add a **GET** route that returns a single book by id.
* **#3** Add status codes to every response. Use:
`res.status([status code]).json({ message: '...' })`
| Status code | When to use? |
| ----------- | ------------------------- |
| 200 | Success returning data |
| 201 | Success creating new data |
| 404 | Data not found |
| 500 | Server error |
For a full list, see [HTTP status codes](https://www.hostinger.com/id/tutorial/http-status-code).
* **#4** Wrap each route in a **try/catch** block for error handling:
```javascript theme={null}
app.post('/books', async (req, res) => {
const { nama, peminjam } = req.body;
try {
await db.books.create({
data: { nama, peminjam },
});
res.json({ message: 'Book added successfully!' });
} catch (err) {
console.log(err.message);
res.status(500).json({ message: err.message });
}
});
```
Add your Github link or project in Google Drive then the community will review and help you together. Please stay tuned on Discord to see the latest updates!
### PUT `/books/:id`
The route uses `/books/:id` so `id` is a **dynamic** segment (it changes per request). Read it with **req.params**:
```javascript theme={null}
const { id } = req.params;
```
In the database query we use **where** so only the book with that `id` is updated:
```javascript theme={null}
app.put('/books/:id', async (req, res) => {
const { id } = req.params;
const { nama, peminjam } = req.body;
await db.books.update({
where: { id },
data: { nama, peminjam },
});
res.json({ message: 'Book updated successfully' });
});
```
### DELETE `/books/:id`
Same idea as PUT: use `req.params.id` and call `db.books.delete()` instead of `update`. Try implementing it yourself.
### Cool-down
Does your API fully implement CRUD? Do all book routes work, including **Delete**? In the next project we'll add **try/catch** for error handling and a route to get a single book by id.
***
# Refinement
Welcome to the final project! Your task is to refine the library API we built by completing the steps below.
> Before uploading your project, delete the **node\_modules** folder.
* **#1** Add a **DELETE** route to remove a book by id.
* **#2** Add a **GET** route that returns a single book by id.
* **#3** Add status codes to every response. Use:
`res.status([status code]).json({ message: '...' })`
| Status code | When to use? |
| ----------- | ------------------------- |
| 200 | Success returning data |
| 201 | Success creating new data |
| 404 | Data not found |
| 500 | Server error |
For a full list, see [HTTP status codes](https://www.hostinger.com/id/tutorial/http-status-code).
* **#4** Wrap each route in a **try/catch** block for error handling:
```javascript theme={null}
app.post('/books', async (req, res) => {
const { nama, peminjam } = req.body;
try {
await db.books.create({
data: { nama, peminjam },
});
res.json({ message: 'Book added successfully!' });
} catch (err) {
console.log(err.message);
res.status(500).json({ message: err.message });
}
});
```
Add your Github link or project in Google Drive then the community will review and help you together. Please stay tuned on Discord to see the latest updates!